OSCARS 100 - Detailed course description
Google - Open Course Map
*click on the boxed frame, top right icon on map to enlarge to full screen view with options in Google Maps.
Terranium Topo Explorer - Open Course Map
Google Map: HERE
Topo Explorer: HERE
Avenza Map: HERE
Distance:101km
Elevation: approx. 5770m
Beautiful she may be, the Hut 2 Hut course is, quite simply, a bit of a brute. Over 100km various GPS units will come up with different results, but our instruments recorded in the vicinity of 5800 metres of gain. Ten peaks will be bagged. Not big by world standards – indeed Buller itself is the highest at 1805m – but try knocking off ten of them in a row, with plenty of diving down to the valley floor before climbing back up and you will know you’ve worked hard.
Here’s the overview playbook:
Course Order: Buller Village > Buller Summit (1805m) > Four Mile (CP at bottom) > Eight Mile (CP) > Refrigerator Gap (CP) > The Bluff (1725m) > Bluff Hut > Mt Lovick (1648m) > Lovicks Hut (CP) > AAWT turn off (CP) > Mt Magdala (1725m) > Hells Window > Big Hill (1668m) > Mt Howitt (1742m) > Gantner Hut (out and back CP) > Viking Wilderness/ Crosscut Saw (1706m) > Mt Buggery (1608) > Horrible Gap > Mt Speculation (1666m) > MT Speculation CP > Muesli Spur > King Valley Hut (CP) > Craigs Hut (CP) > Geelong Grammar Hut (CP) > Mt Stirling (1749m) > Howqua Gap Hut (CP) > Mt Buller Summit (1805m) > Buller Village finish.
Checkpoints:
· 11.9km > Howqua River / bottom of Four Mile (minor)
· 18.4km > Eight Mile Flat (major)
· 25.6km > Refrigerator Gap (minor)
· 32km > Bluff Hut (major)
· 38.1km > Lovicks Hut (major CUT OFF #1 > 2pm day 1)
· Turn off to AAWT (minor) 41.2km
· Turn off to Gantner Hut 50.5km (marshals only)
· 51.3km > Gantner Hut (minor > overnight mandatory emergency stop post 5pm, release @ 5am day 2)
· 60.8km > Mt Speculation Car Park (major)
· 73.2km > King Hut (major – CUT OFF# 9pm Day 1 + 6pm Day 2)
· 80.1km > Craigs Hut (minor)
· 84.5km > Geelong Grammar Hut (minor)
· 89.3km > Howqua Hut (major)
· 98.3km > Buller Summit (tear page from book as proof of ascent)
· 101km > Finish – Buller Village Square (major)

Here’s the section by section playbook*:
*click on the map images to view larger versions.
SECTION ONE
VILLAGE START – MT BULLER SUMMIT
Runners and trekkers begin at the Buller Resort Village (which will also be the finish). From the central courtyard, it’s a dash up the guts of Athlete’s Walk, past the supermarket and accommodation buildings and Abom, hitting the main road. Follow that until you hit Arlberg Hotel on your left.
Opposite is a car park and a small wooden arch. Follow the trail that leads under that (Summit Nature Walk trail). It takes you to near the Northside Discovery Centre, where you will veer left across a road and onto singletrack past Burnt Hut Reservoir, eventually leading you to the base of the Buller Summit. Look up – and step up. It’s an out and back to the Summit proper (approx. 300 metres).
Leg distance: 2.6km
Leg Ascent: 214m
Leg Descent: 0m
Cumulative distance: 2.6km
Cumulative Ascent: 214m
Cumulative Descent: 0m
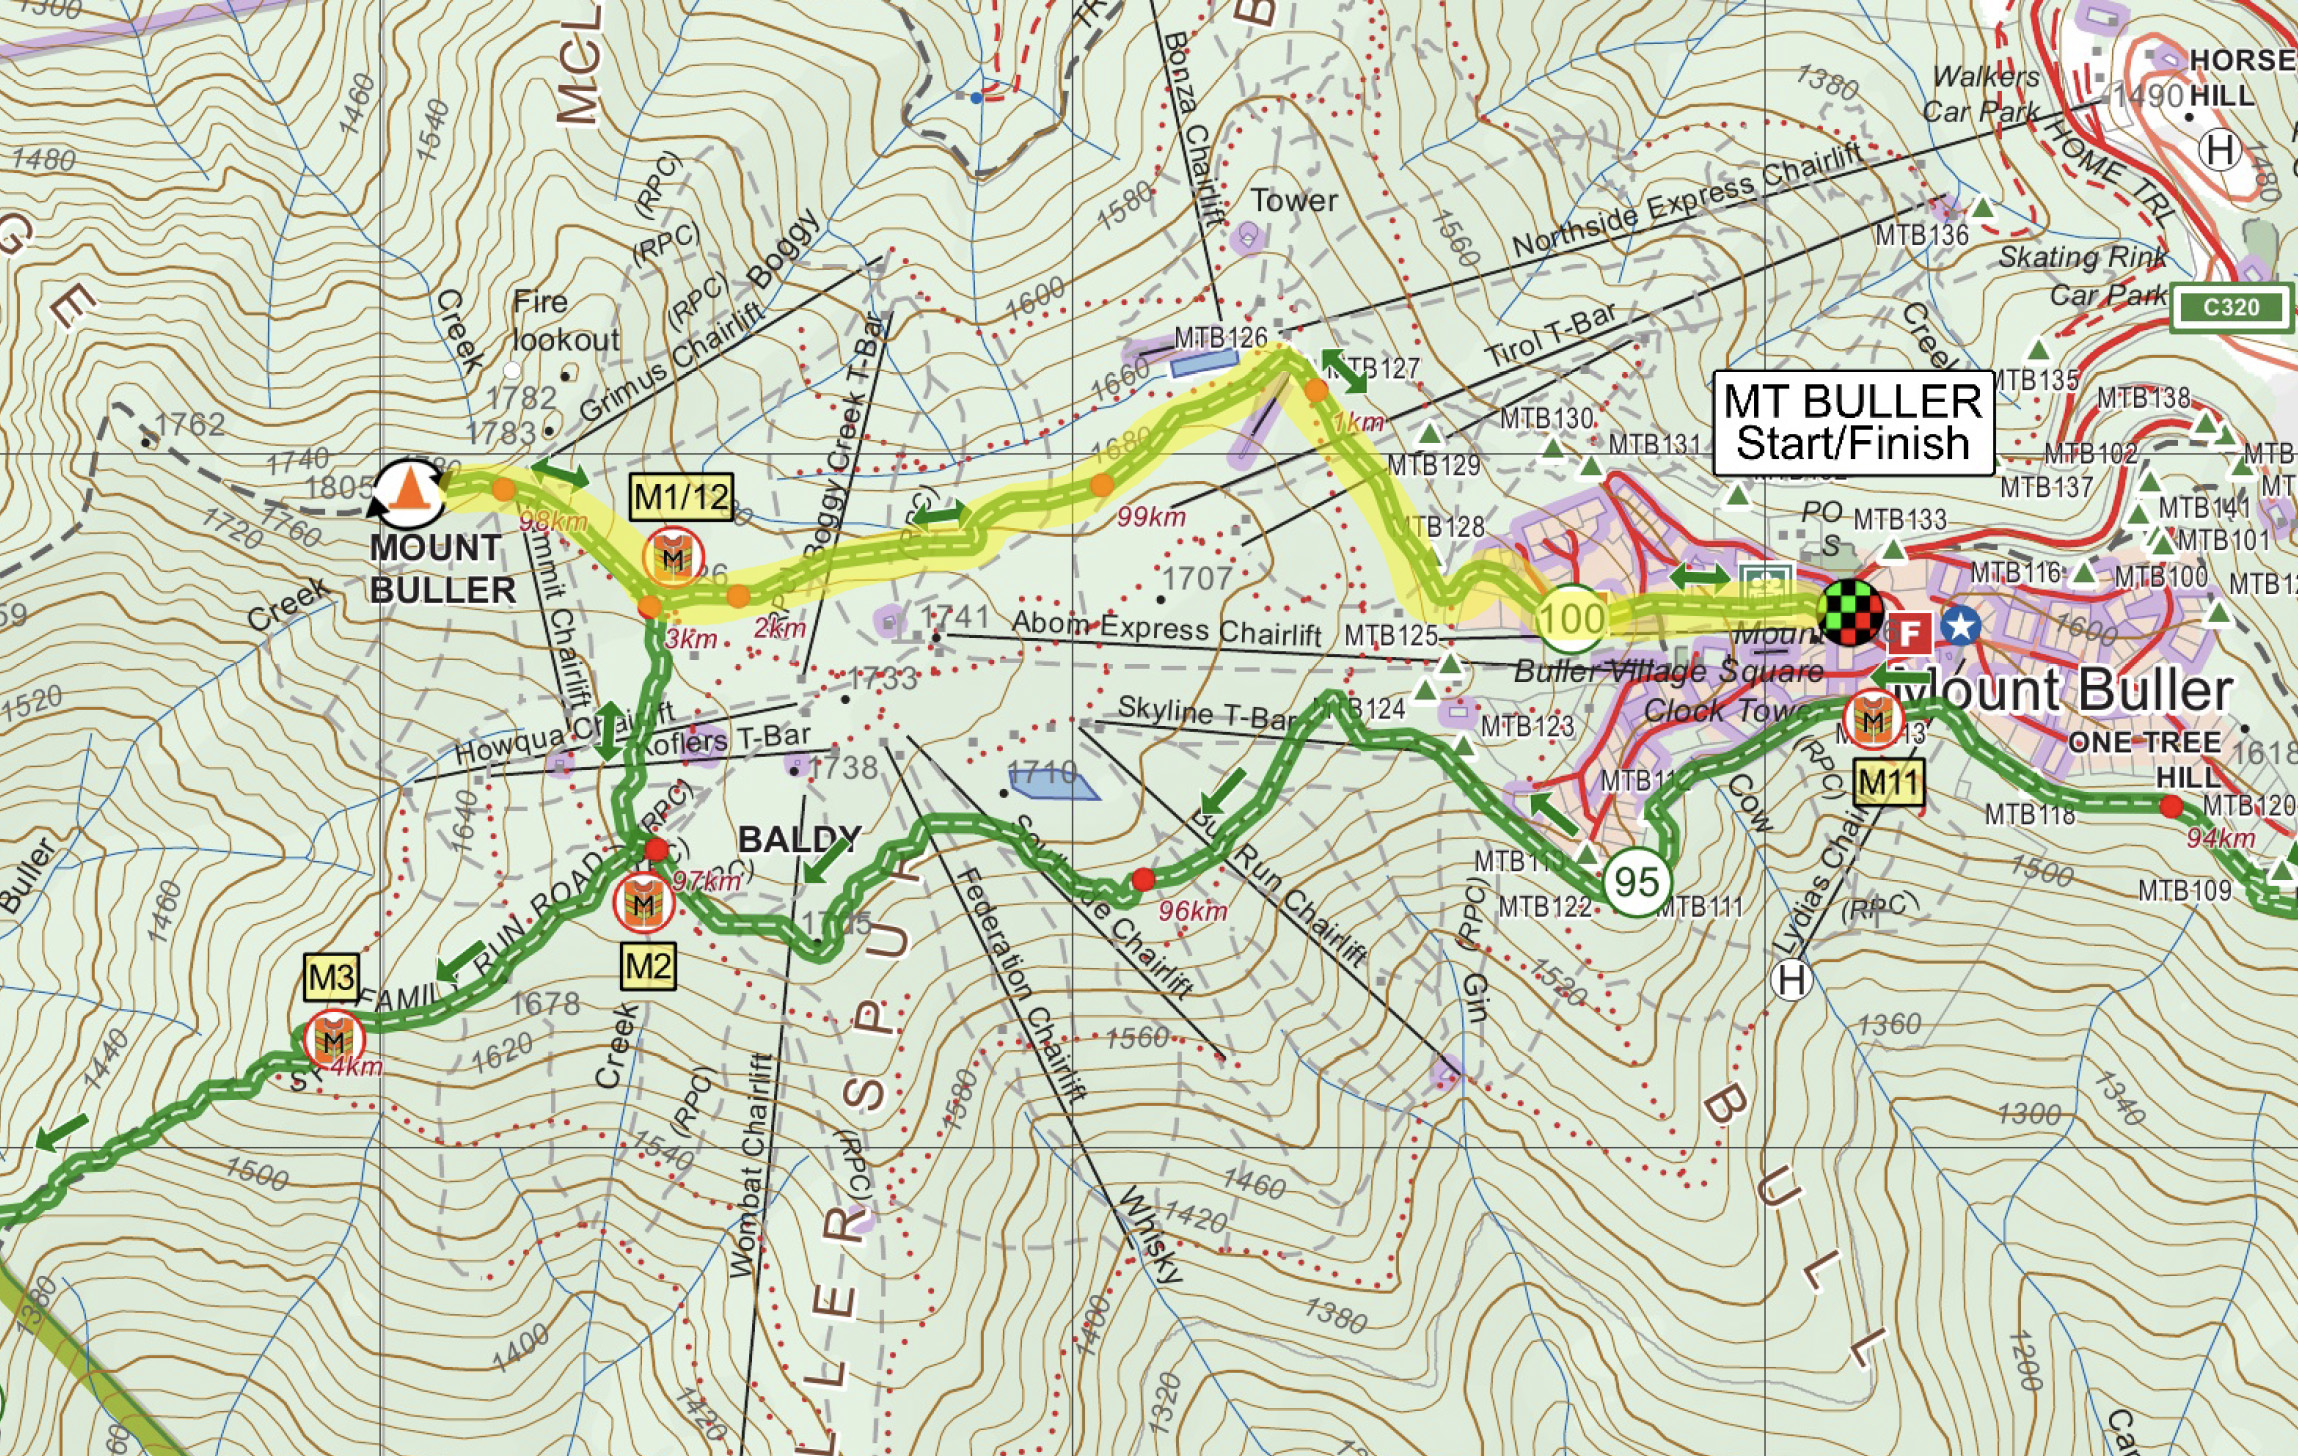
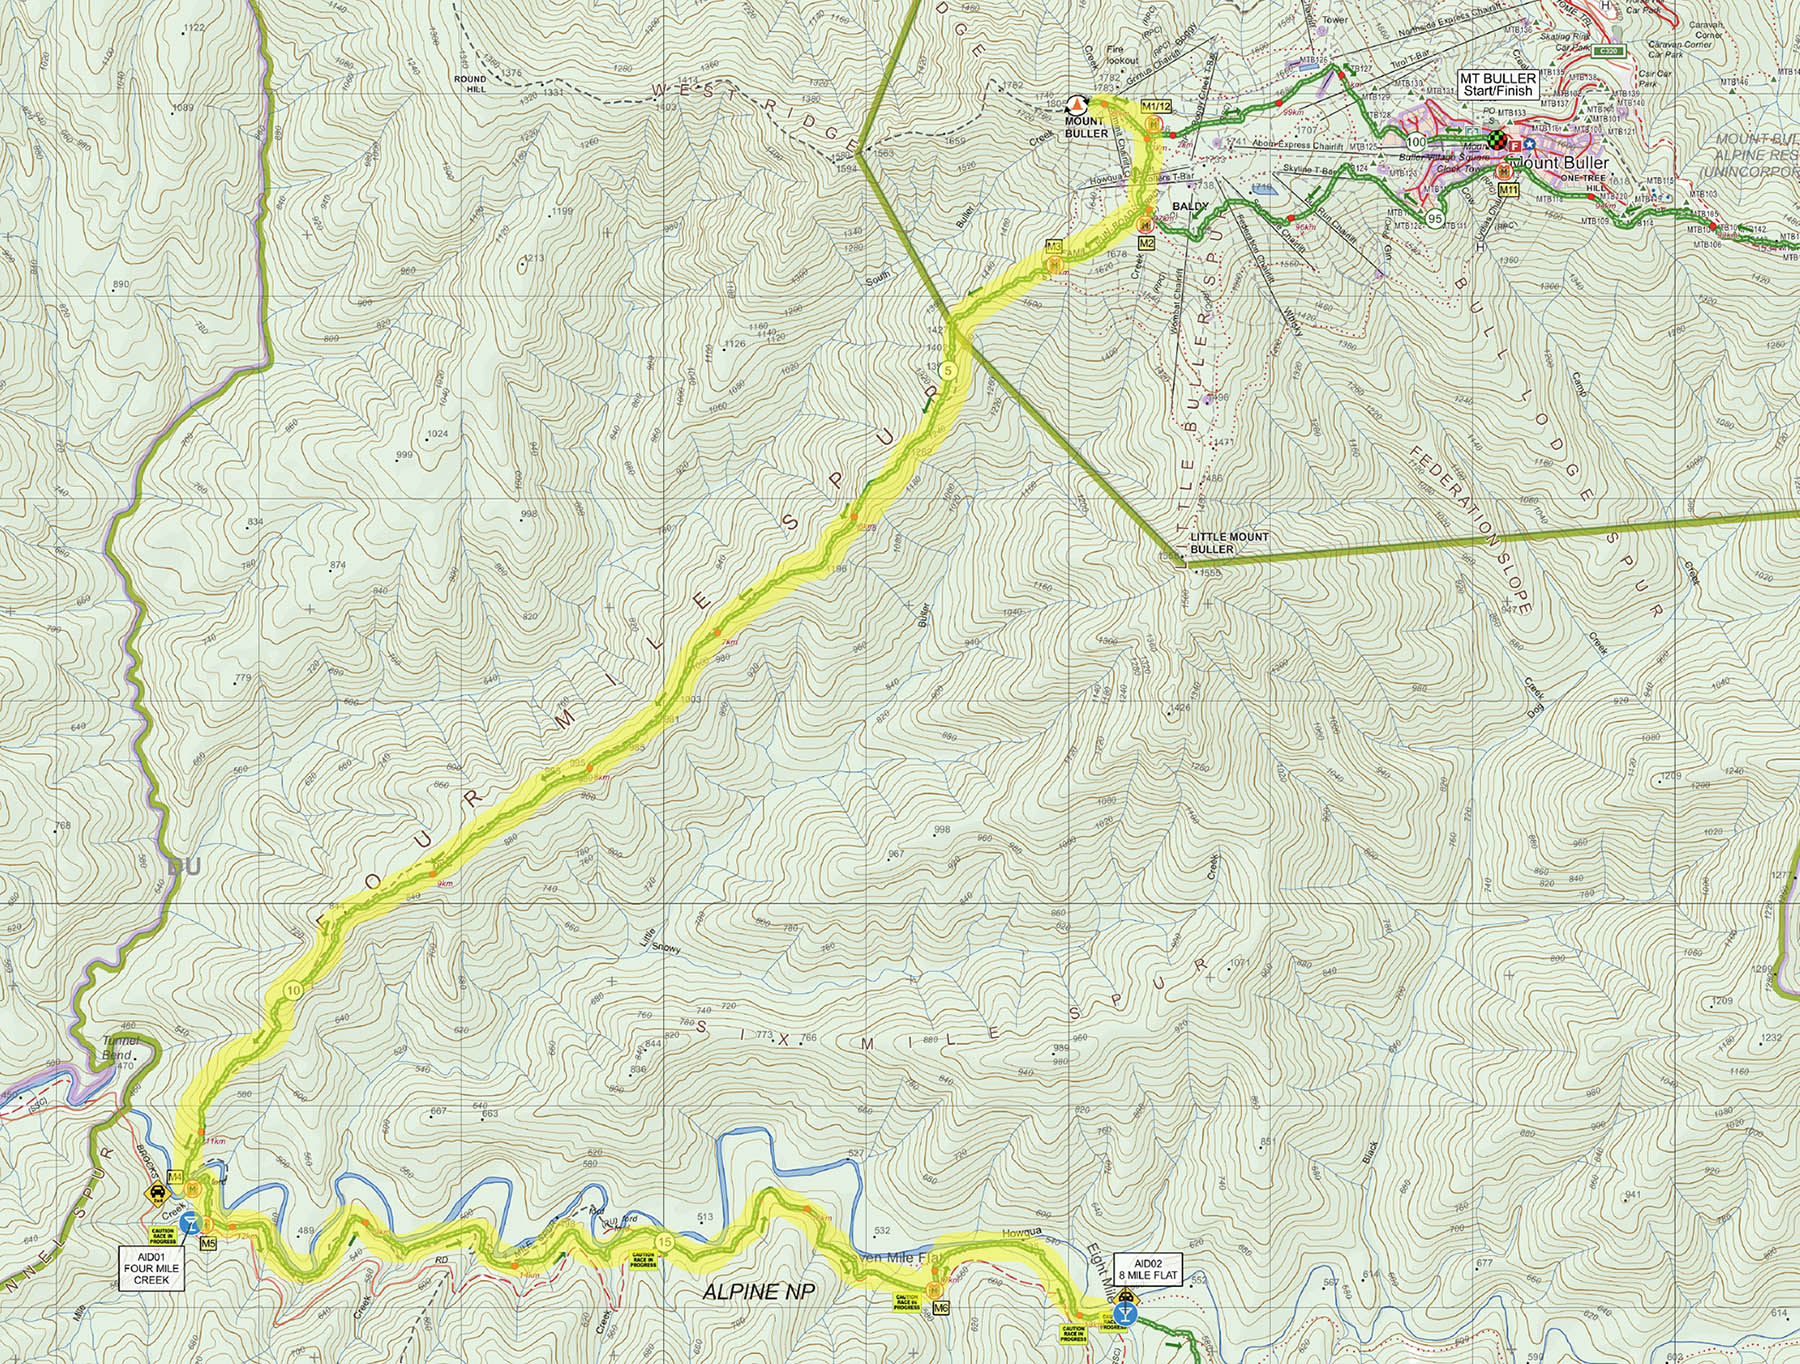
SECTION TWO
MT BULLER SUMMIT – EIGHT MILE
From the summit of Mt Buller, it’s a bomb back down, swinging to the right, hooking up with a dirt road, which drops you down to a bend with a huge netting on it. At the bottom, don’t hug the road, which sweeps right. Leave it. Yep, on that corner you’re turning left, going down into the bush. Follow the ribbons into it, scrambling down some super rocky and technical terrain as you make your way down Four Mile, a ridge that will lead you 8km and 1300+- vertical meters down to the Howqua River. Be careful in the first section, it’s easy to get off track – which is not well defined – and suddenly find yourself sliding off the ridge. There are big rocky sections early on – hard to run if you’re trying to. We won't lie - this is a tricky section of bush as it's tight, scratchy, and not always an obvious trail (although much better than it was in Year One!). The trail gets more defined the further down you go (after 4km), weaving in and out of tee tree stands higher up, getting tight in some patches. There is a magnificent viewpoint early on where you scramble atop a rocky outcrop (PLEASE TAKE CARE HERE AND DO NOT TRY TO OVERTAKE AT THIS POINT).
After that it’s back into the bush and down, down, down, the trail getting much more trottable as you get nearer the river. Watch your footing – there is a lot of ground scrub and fallen debris / sticks, so it is easy to trip. You’ll pop out at the river – cross over and pick up the trail (dart in to see Gardiners’ Hut (private) to the left if you like), but the challenge trail hooks to the right just before the hut clearing and leads up to where you will find an Aid Station, make sure you turn right and get checked off at the first checkpoint (MANDATORY) before you head off beach east on the main trail.
After the Aid Station, follow the single track sidling east along the river for 6.0km. You'll cross the Howqua River 6 times in this section so pack a spare pair of socks rather than take your shoes off at each crossing, you won't have time. The track will have you pop out at Seven Mile Creek/Flat. Follow the road/path until the end of the camp area and head up the 8 Mile High Trail (not the low). The singletrack will lead you to emerge at a bend in the access road to Eight Mile Flat. Continue on ahead, making your way to the Eight Mile Flat campground and second Aid Station.
4 Mile / 8 Mile Cut Offs - all competitors
- 4 Mile – 9.00AM for all competitors
- 8 Mile – 11.30AM for all competitors
*It is imperative that you keep moving at a decent speed – trekkers inclusive – hence you must stay ahead of these cut offs times to ensure you don’t DNF.
**Note that the cut offs above are directed at the three day participants. Two day targeting King Hut and single day participants need to be well ahead of these cut offs to make the Lovicks Hut 2pm cut off!
Leg distance: 15.8km
Leg Ascent: 335m
Leg Descent: 1586m
Cumulative distance: 18.4km
Cumulative Ascent: 549m
Cumulative Descent: 1586m
SECTION THREE
EIGHT MILE – REFRIGERATOR GAP
At the Eight Mile Checkpoint, get your huff’n’puff on as you have a 5km section rising a whopping 907m+ vertical metres. Be sure to spin around every so often to take in the views back to Mt Buller. Nearing the top, you will swing east onto Rocky Ridge, a beautiful pasture of knarled gums and great views across to the Bluff (deep breath, you climb that soon). Follow the trail that soon swings right meeting with Bluff Link Road.
Refrigerator Gap Cut Off - all competitors
- 2.30PM
*It is imperative that you keep moving at a decent speed – trekkers inclusive – hence you must stay ahead of these cut offs times to ensure you don’t DNF.
**Note that the cut off above is directed at the three day participants. Two day targeting King Hut and single day participants need to be well ahead of these cut offs to make the Lovicks Hut 2pm cut off!
Leg distance: 7.2km
Leg Ascent: 907m
Leg Descent: 217m
Cumulative distance: 25.6km
Cumulative Ascent: 1456m
Cumulative Descent: 1803m
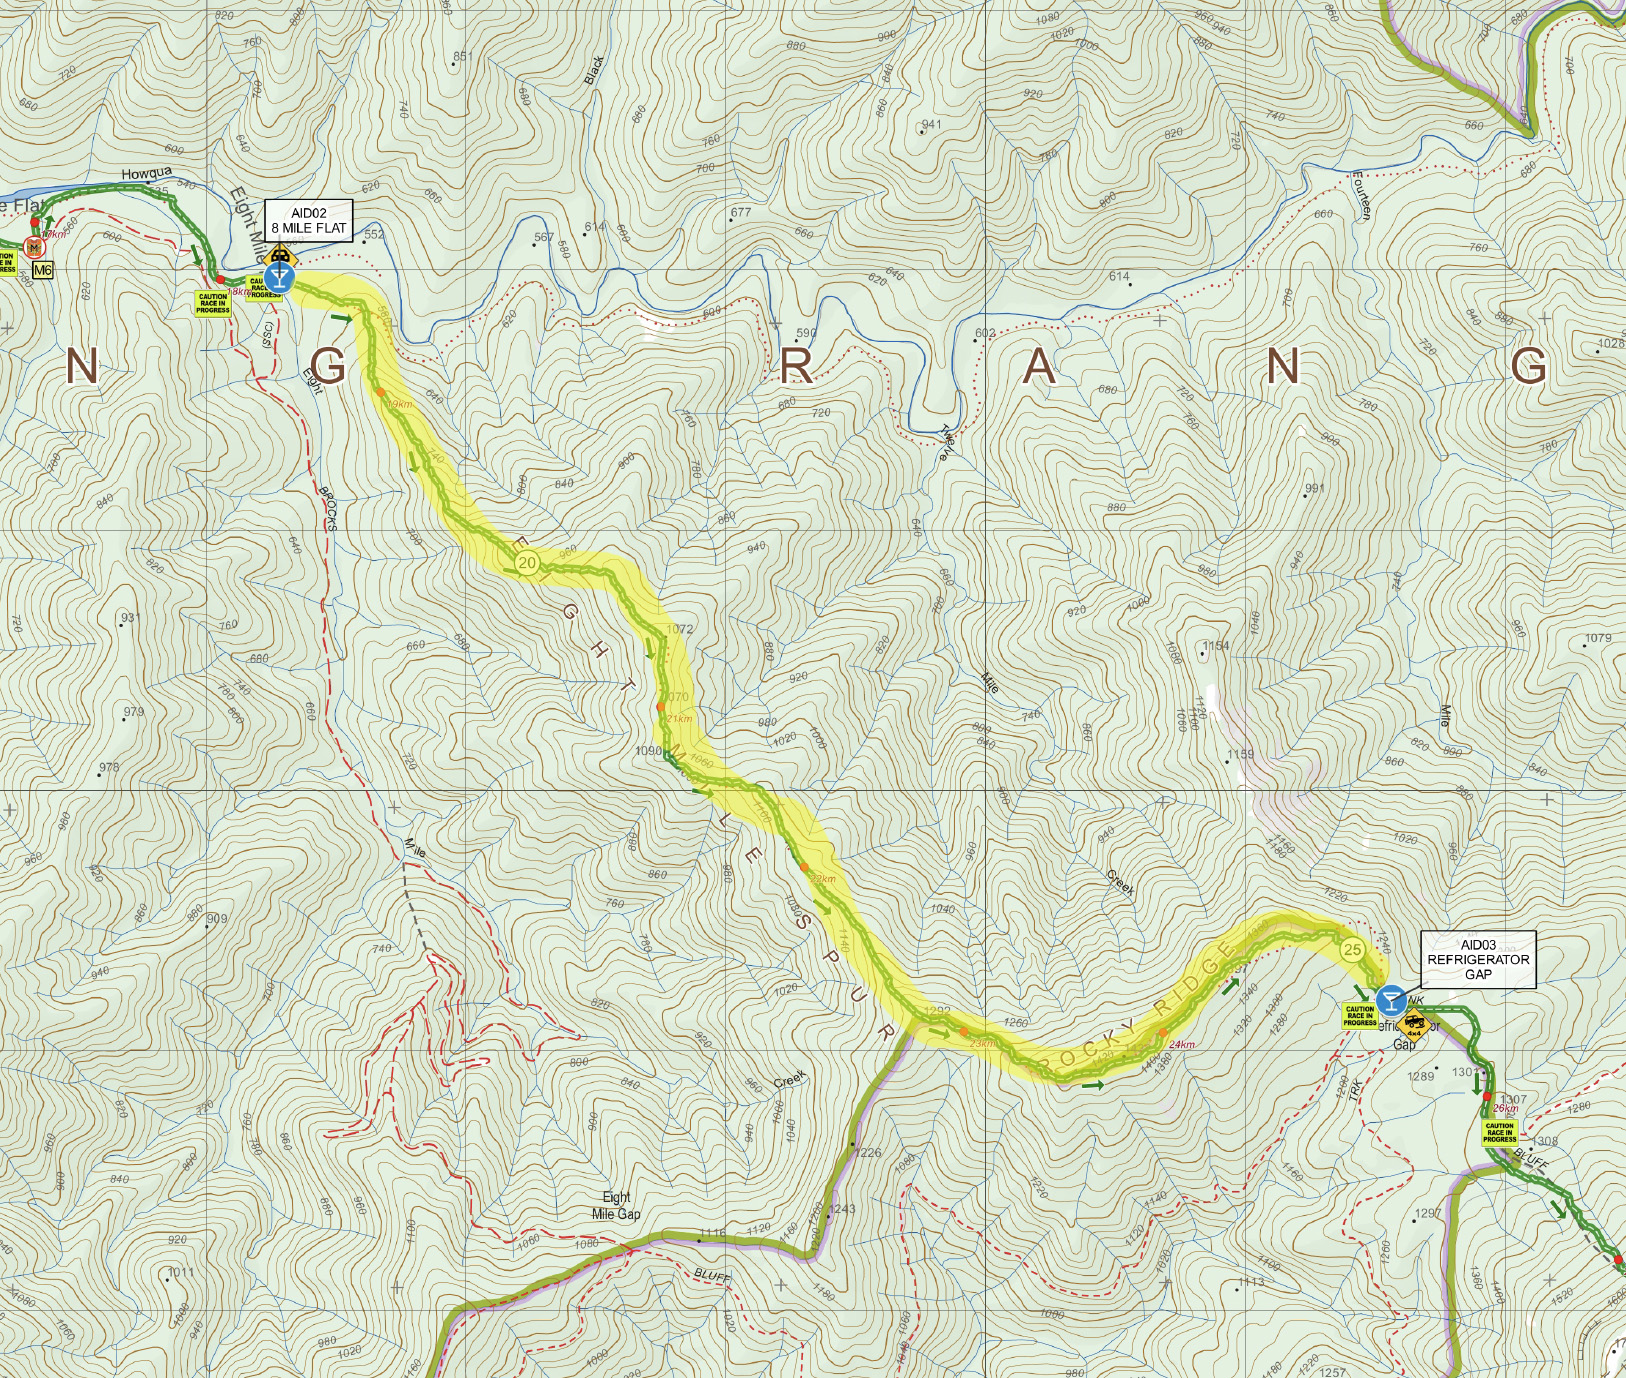
SECTION FOUR
REFRIGERATOR GAP – BLUFF HUT
A marshal at Refrigerator Gap will keep you on track – which is to head directly up the road (south east) for 900 metres before turning off (veer right as the road veers left) onto Bluff Walking Track. Suck it up – you now have a pinchy 1.5km/400 metre vertical ascent to the top of the Bluff (1725m). From here it is another 4.5km to Bluff Hut, where you will meet the 4WD Bluff Track and a small aid station.
Bluff Hut Cut Off - all competitors
- 4.30PM
*It is imperative that you keep moving at a decent speed – trekkers inclusive – hence you must stay ahead of these cut offs times to ensure you don’t DNF.
**Note that the cut off above is directed at the three day participants. Two day targeting King Hut and single day participants need to be well ahead of these cut offs to make the Lovicks Hut 2pm cut off!
Leg distance: 6.4km
Leg Ascent: 557m
Leg Descent: 305m
Cumulative distance: 32km
Cumulative Ascent: 2013m
Cumulative Descent: 2108m
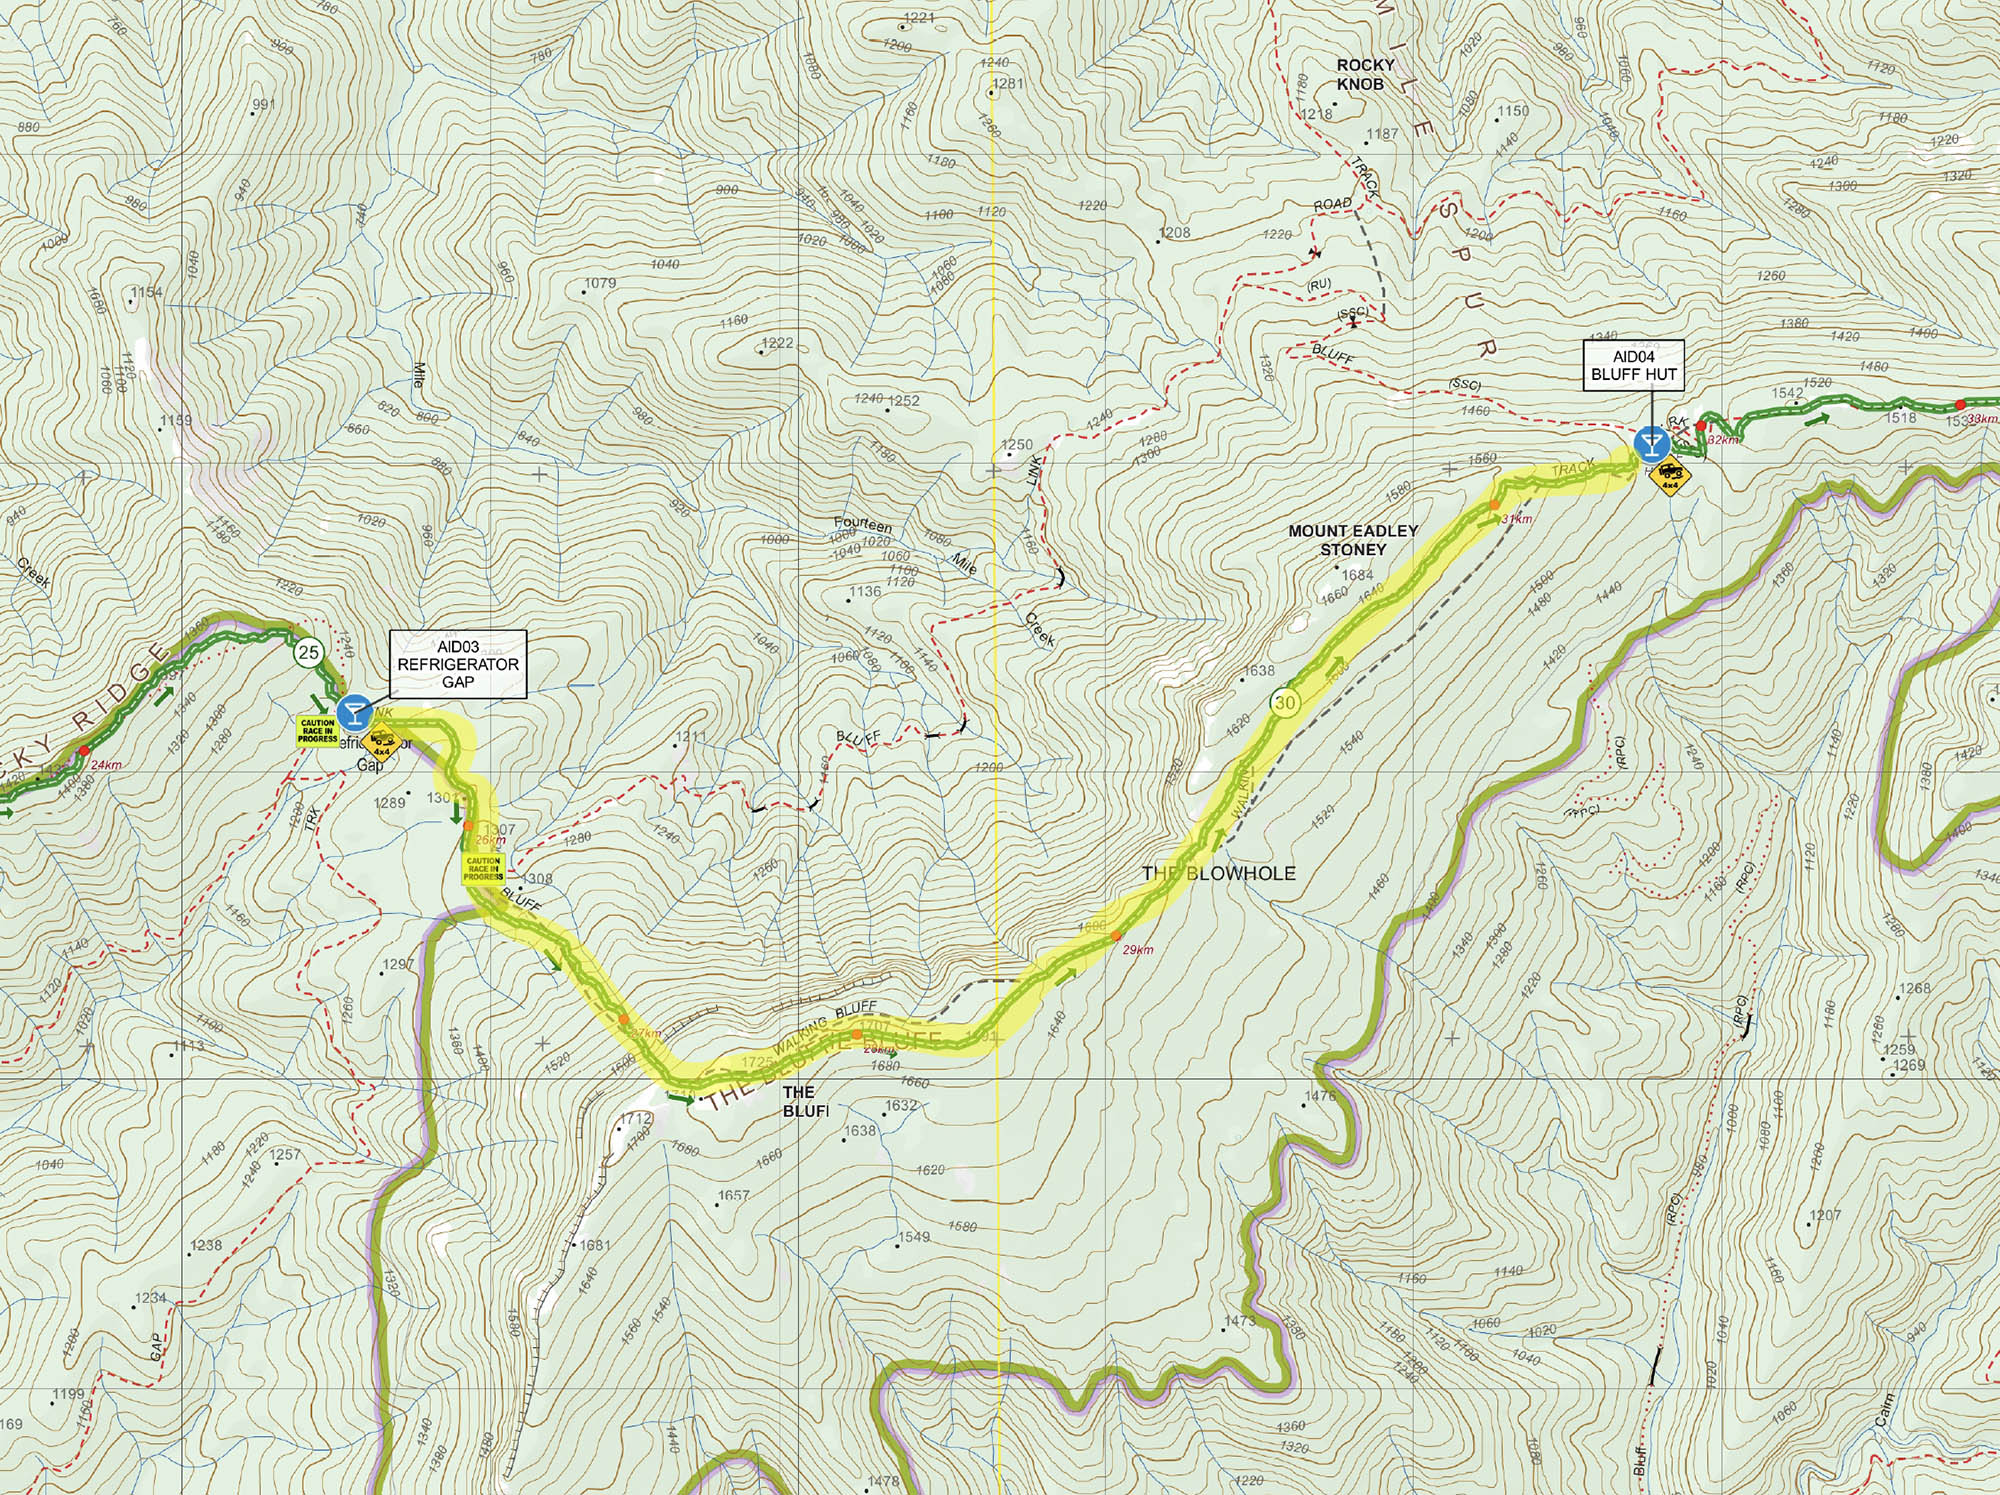
SECTION FIVE
BLUFF HUT – LOVICKS HUT
A relatively straightforward section, following (4WD) Bluff Track over Mt Lovick (1684m) and on to Lovicks Hut, a major aid station. Note that about 4.8km from Bluff Hut there is a singletrack veering off to the left, which shortcuts the road, leading to Lovicks Hut. Take this trail – it is the official course route! (why stay on road when there’s singletrack?).
NOTE:No runner is allowed to pass Lovicks Hut after 1:00pm on Friday. Any runner wishing to progress past Lovicks on Friday 14th MUST LEAVE BEFORE THE 1PM CUTOFF. Any 1-Day Solo Runners not out of the checkpoint by the time the sweeps leave at 1:00PM will be listed as DNF
Lovicks Hut Cut Offs
- 1 Day Solo runners – 1PM
- 2 Day Solo and all Teams – 7PM
*It is imperative that you keep moving at a decent speed – trekkers inclusive – hence you must stay ahead of these cut offs times to ensure you don’t DNF
Leg distance: 6.1km
Leg Ascent: 225m
Leg Descent: 252m
Cumulative distance: 38.1km
Cumulative Ascent: 2338m
Cumulative Descent: 2360m

SECTION SIX
LOVICKS HUT – AAWT – GANTNER HUT
From the refresher of Lovicks, it’s a little further on the 4WD track – check a few of the viewpoints along this stretch – they are special and take in pretty much all of the huge loop you are trying to get around, all the way back to Buller, which on a clear day you will spy! Approximately 3km along Bluff track, after passing the famous King Billy Tree, you will come to a marshalled turnoff onto the Australian Alpine Walking Track (AAWT).
NOTE: after leaving AAWT the next major aid station is approximately 20km, so please ensure you are fully stocked with water and supplies for this section prior to leaving AAWT
AAWT Intersection Cut Off
- 1 Day Solo runners – 2.00PM Friday
- 2 Day Solo and all Teams – 6.30AM Saturday
Take AAWT trail left off the 4WD track and get ready for potentially the best trail walking / running to be found in the State! Ahead is a series of peaks to be bagged and the famous ‘Crosscut Saw’ to be traversed.
First up, it’s Mt Magdala (1725m), on past Hells Window and up Big Hill (1668m). The rollercoaster continues, with Mt Howitt next up (1742m). Keep on the trail heading north east (do NOT take the trail that heads back to West Peak and down Howitt Spur!). From Howitt it’s a single-track sweep to the turn-off to Vallejo Gantner Hut. It is MANDATORY for all participants to take the out and back to Gantner, which is checkpoint only,with only emergency supplies stocked (it is a remote aid station, so we can’t get enough supplies in for it to be a major aid station).
*There is mobile reception at turn-off to Gantner.
GANTNER HUT - EMERGENCY CUT OFF
- 1 Day Solo runners – 4.00PM Friday
- 2 Day Solo and all Teams – 11.00AM Saturday
*It is imperative that you keep moving at a decent speed – trekkers inclusive – hence you must stay ahead of these cut offs times to ensure you don’t DNF.
Leg distance: 13.2km
Leg Ascent: 861m
Leg Descent: 730m
Cumulative distance: 51.3km
Cumulative Ascent: 3099m
Cumulative Descent: 3090m
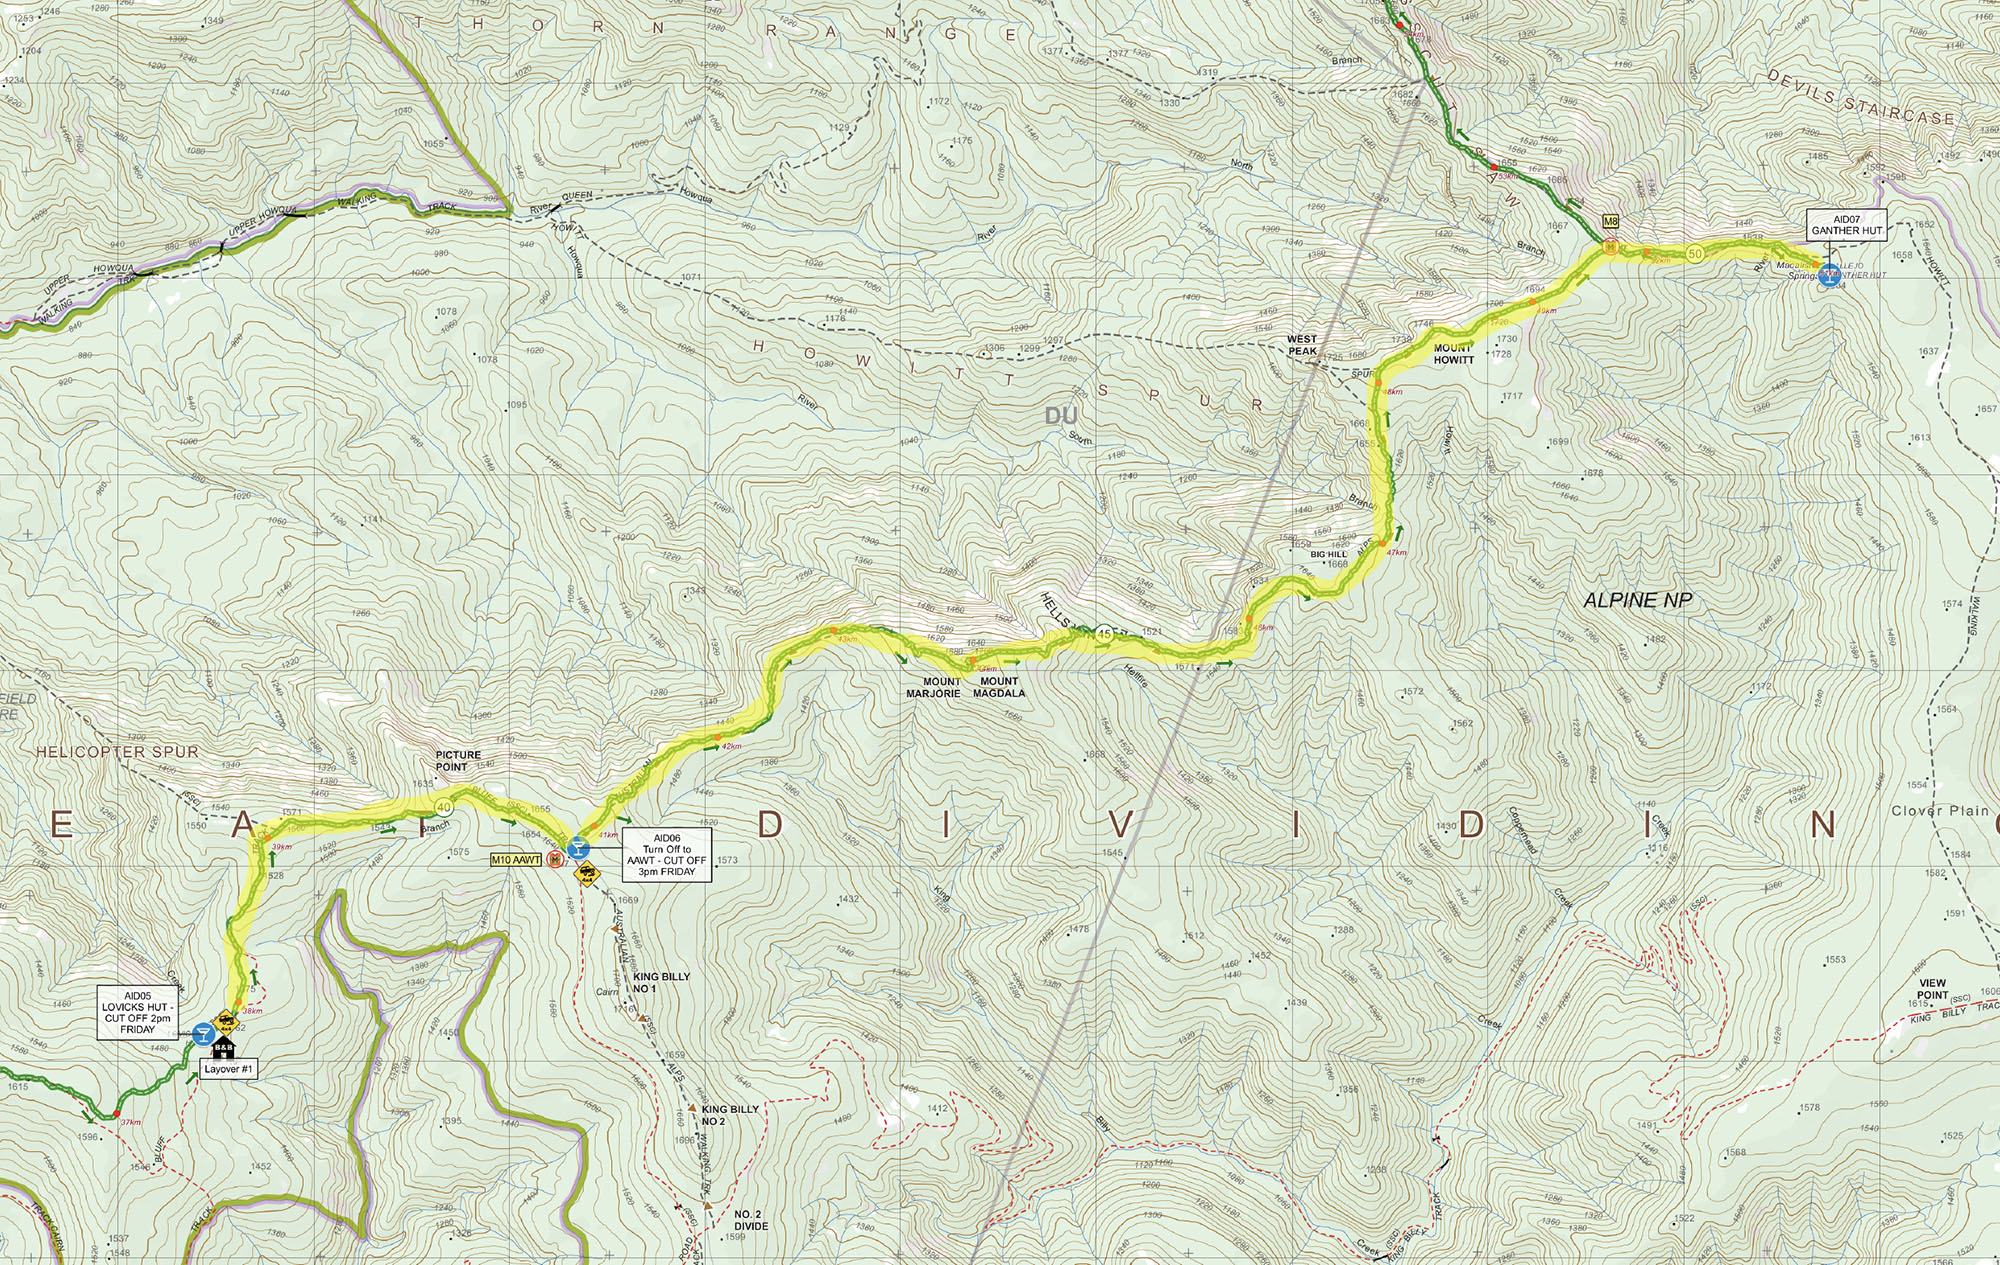
SECTION SEVEN GANTNER HUT –
MT SPECULATION CAR PARK
From Gantner, where you need to check in with our marshals, it’s back out to the main AAWT trail (1.5km) and a right hand turn north up into the mighty Viking Wilderness Area and the jaw dropping Crosscut Saw, a high, thin-wedge ridgeline that will have you hollering and whooping. Simply awesome.
From Gantner turn off, it’s 8km along the ridge, bagging Mt Buggery (1608m), via Horrible Gap to eventually climb up Mt Speculation (1666m).
NOTE: there are some sections along this part of the course where the wilderness closes in, gets a bit scratchy, there is some clambering and a few ‘big-step’ rock ledges to get up. Please be extremely careful in this section – you are on a ridge so if you lose the course a little, stay high and keep moving forward (better yet – get your mobile out, locate yourself on the Avenza Map, and get back on course!).
Roughly 500 metres after the summit of Speculation, you will turn off the AAWT, taking the trail to the left for another 800 or so metres to hit Mt Speculation Campsite and a small aid station at what we call Speculation Car Park.
Mt Speculation CP Cut Offs
- 1 Day Solo runners - 7PM Friday
- 2 Day Solo and all Teams – 3PM Saturday
*It is imperative that you keep moving at a decent speed – trekkers inclusive – hence you must stay ahead of these cut offs times to ensure you don’t DNF.
Leg distance: 9.5km
Leg Ascent: 685m
Leg Descent: 810m
Cumulative distance: 60.8km
Cumulative Ascent: 3784m
Cumulative Descent: 3900m
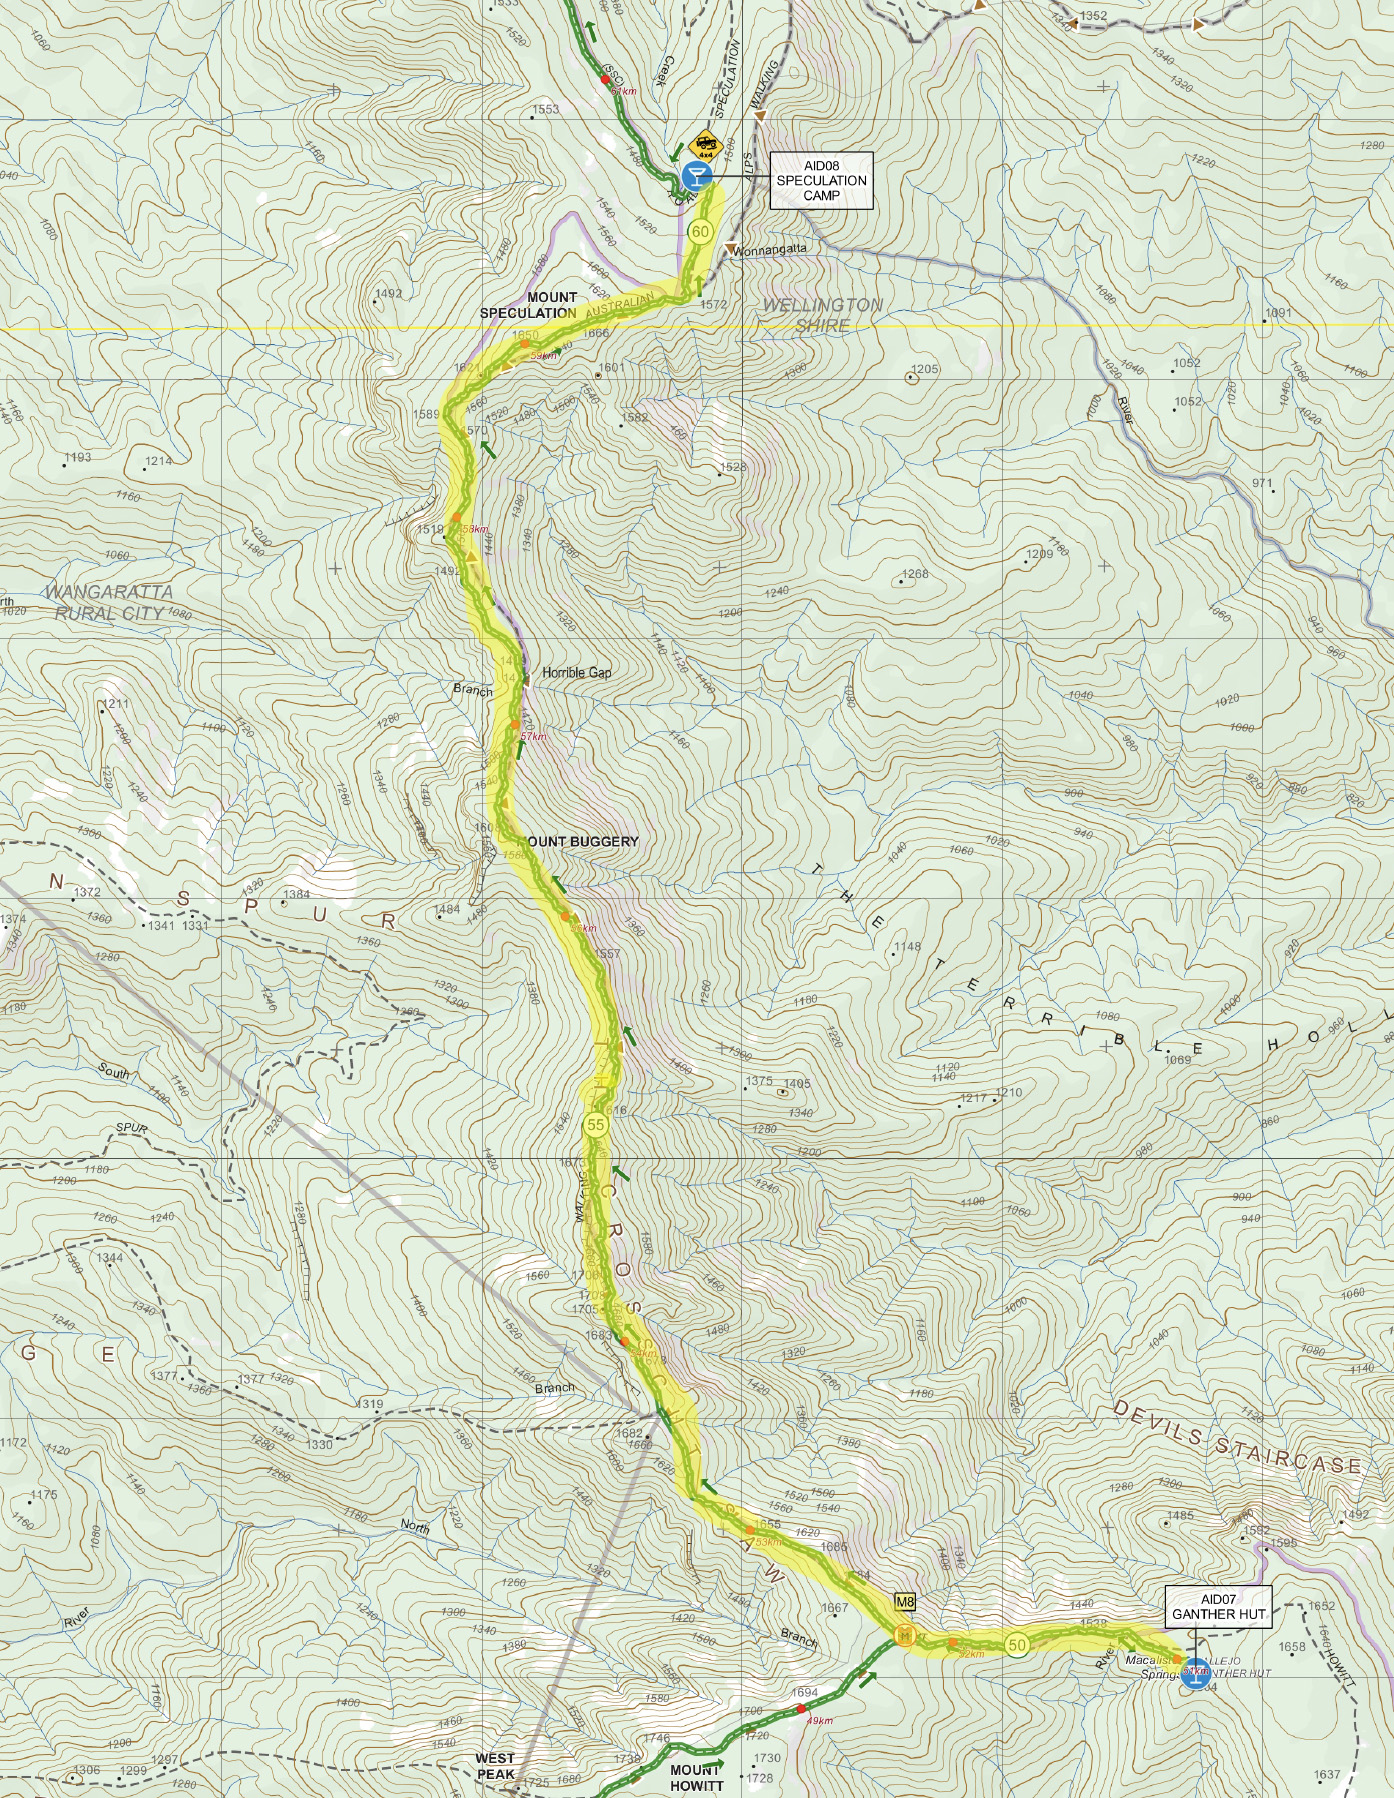
SECTION EIGHT
MT SPECULATION CAR PARK – KING HUT
From the Speculation campsite / aid station, follow the Speculation Road which traverses Mustering Flat (can you hear the echoes of the pioneering horsemen!).
Run/trek for 7.6km from the campsite before looking for the left-hand turn, off the road and down Muesli Spur Track. It’s about to get fun and fast! This single-track drops nearly 600 metres in 3.5km! Up top it’s definitely scramble territory but down lower it’s zoom, zoom, zoom. At the bottom it’s another kilometre in to the major aid station at King Hut.
King Hut Cut Offs
- 1 Day Solo runners – 9PM Friday
- 2 Day Solo and all Teams – 6PM Saturday
There are no further layover points past Kings Hut. If you miss cut off times from this checkpoint you will be required to stop and will be returned to Mt Buller via 4WD vehicle. Unfortunately, your result will officially be a DNF.
*It is imperative that you keep moving at a decent speed – trekkers inclusive – hence you must stay ahead of these cut offs times to ensure you don’t DNF.
Leg distance: 12.4km
Leg Ascent: 2965m
Leg Descent: 886m
Cumulative distance: 73.2km
Cumulative Ascent: 3981m
Cumulative Descent: 4786m
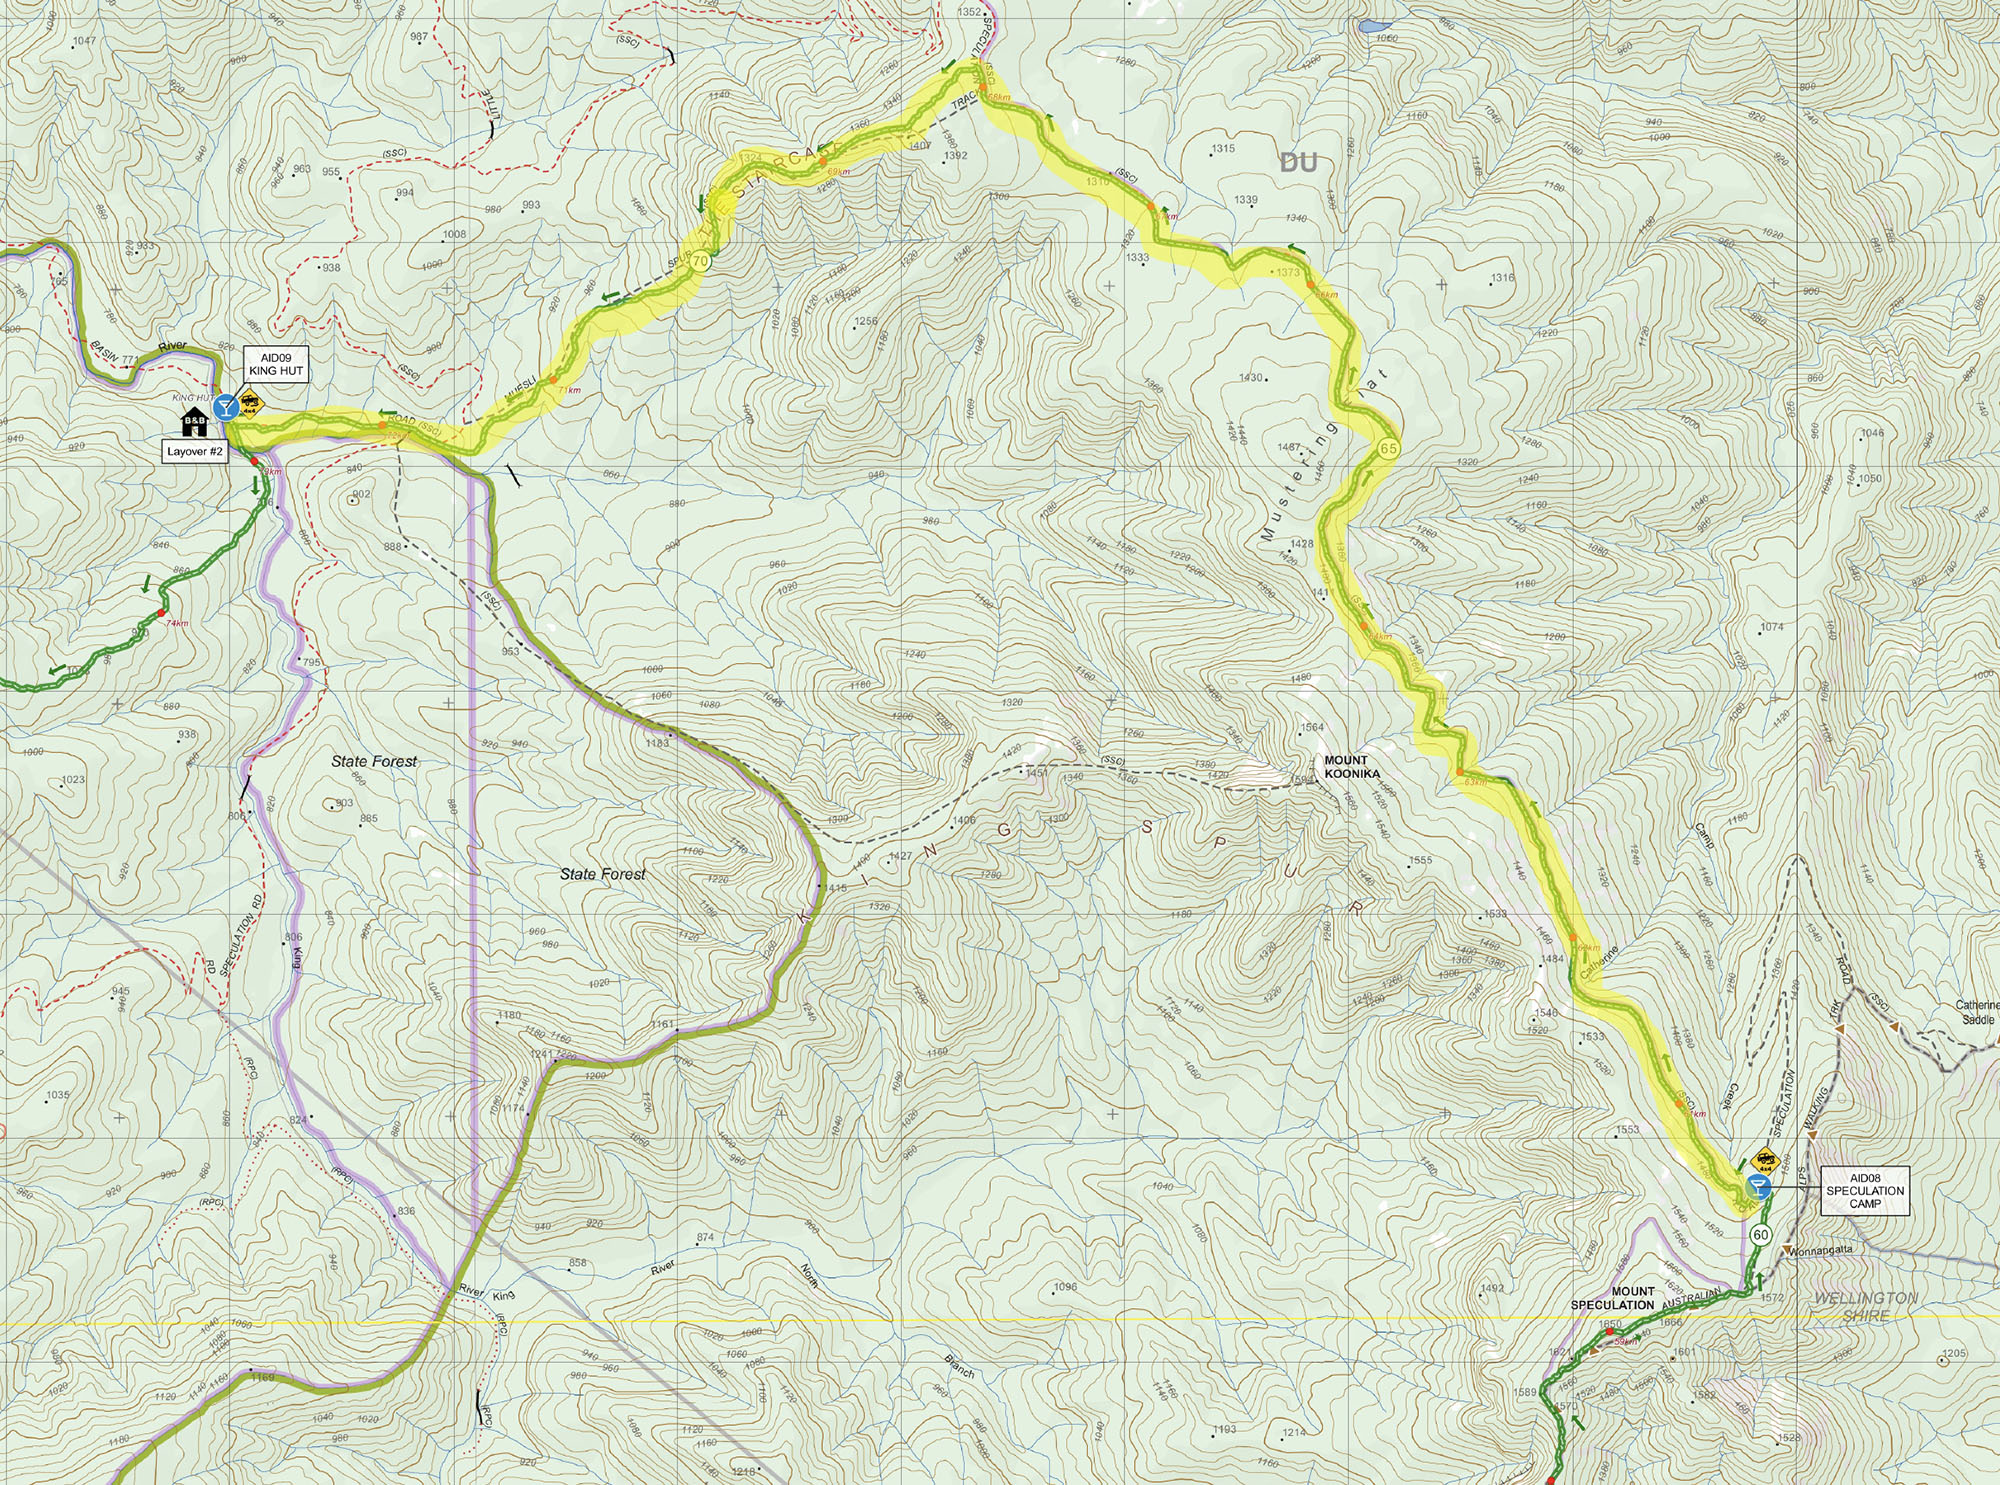
SECTION NINE
KING HUT – CRAIG’S HUT
From King Hut, you may feel like you’re on the home stretch with 26.8km to go. Don’t relax, there’s some hard yards still to be done.
Out of King Hut (you need to run into the campsite, check in, before running back out the way you came for a few hundred metres), you will take an old 4WD trail after a small river crossing on your right, and bang! Into a big climb. Feeling those calves yet?
The 4WD track (nameless) will climb up towards Pete Corner, a U-bend on the main Circuit Road. But before you hit the that corner and the main road, veer off to the right, up into a single-track we call Pete's track (or Blackberry Bastard Alley, cause you will swear all the way up it). This singletrack climbs up to join Circuit Road higher up.
Hitting Circuit Road (fairly well groomed 2WD road), turn right and follow until the turn off to Craig’s Hut. Climb left up Clear Hills Track for about 1.5km before veering off right on a singletrack – another shortcut that pops you out in front of Craig’s Hut, as made famous in The Man From Snowy River. Interesting fact: it’s a great hut but indeed is a re-creation of a fake! Craig’s Hut was only first built as a set for the movie. It then became a tourist attraction, before burning down and being rebuilt.
Craigs Hut Cut Offs*
- 1 Day Solo runners – 10.30PM Friday
- 2 Day Solo and 2 Day Teams – 7.30PM Saturday
- 3 Day Teams – 6.30AM Sunday
*It is imperative that you keep moving at a decent speed – trekkers inclusive – hence these cut offs are to ensure you stay ahead of an overall DNF.
Leg distance: 6.9km
Leg Ascent: 739m
Leg Descent: 69m
Cumulative distance: 80.1km
Cumulative Ascent: 4720m
Cumulative Descent: 4856m
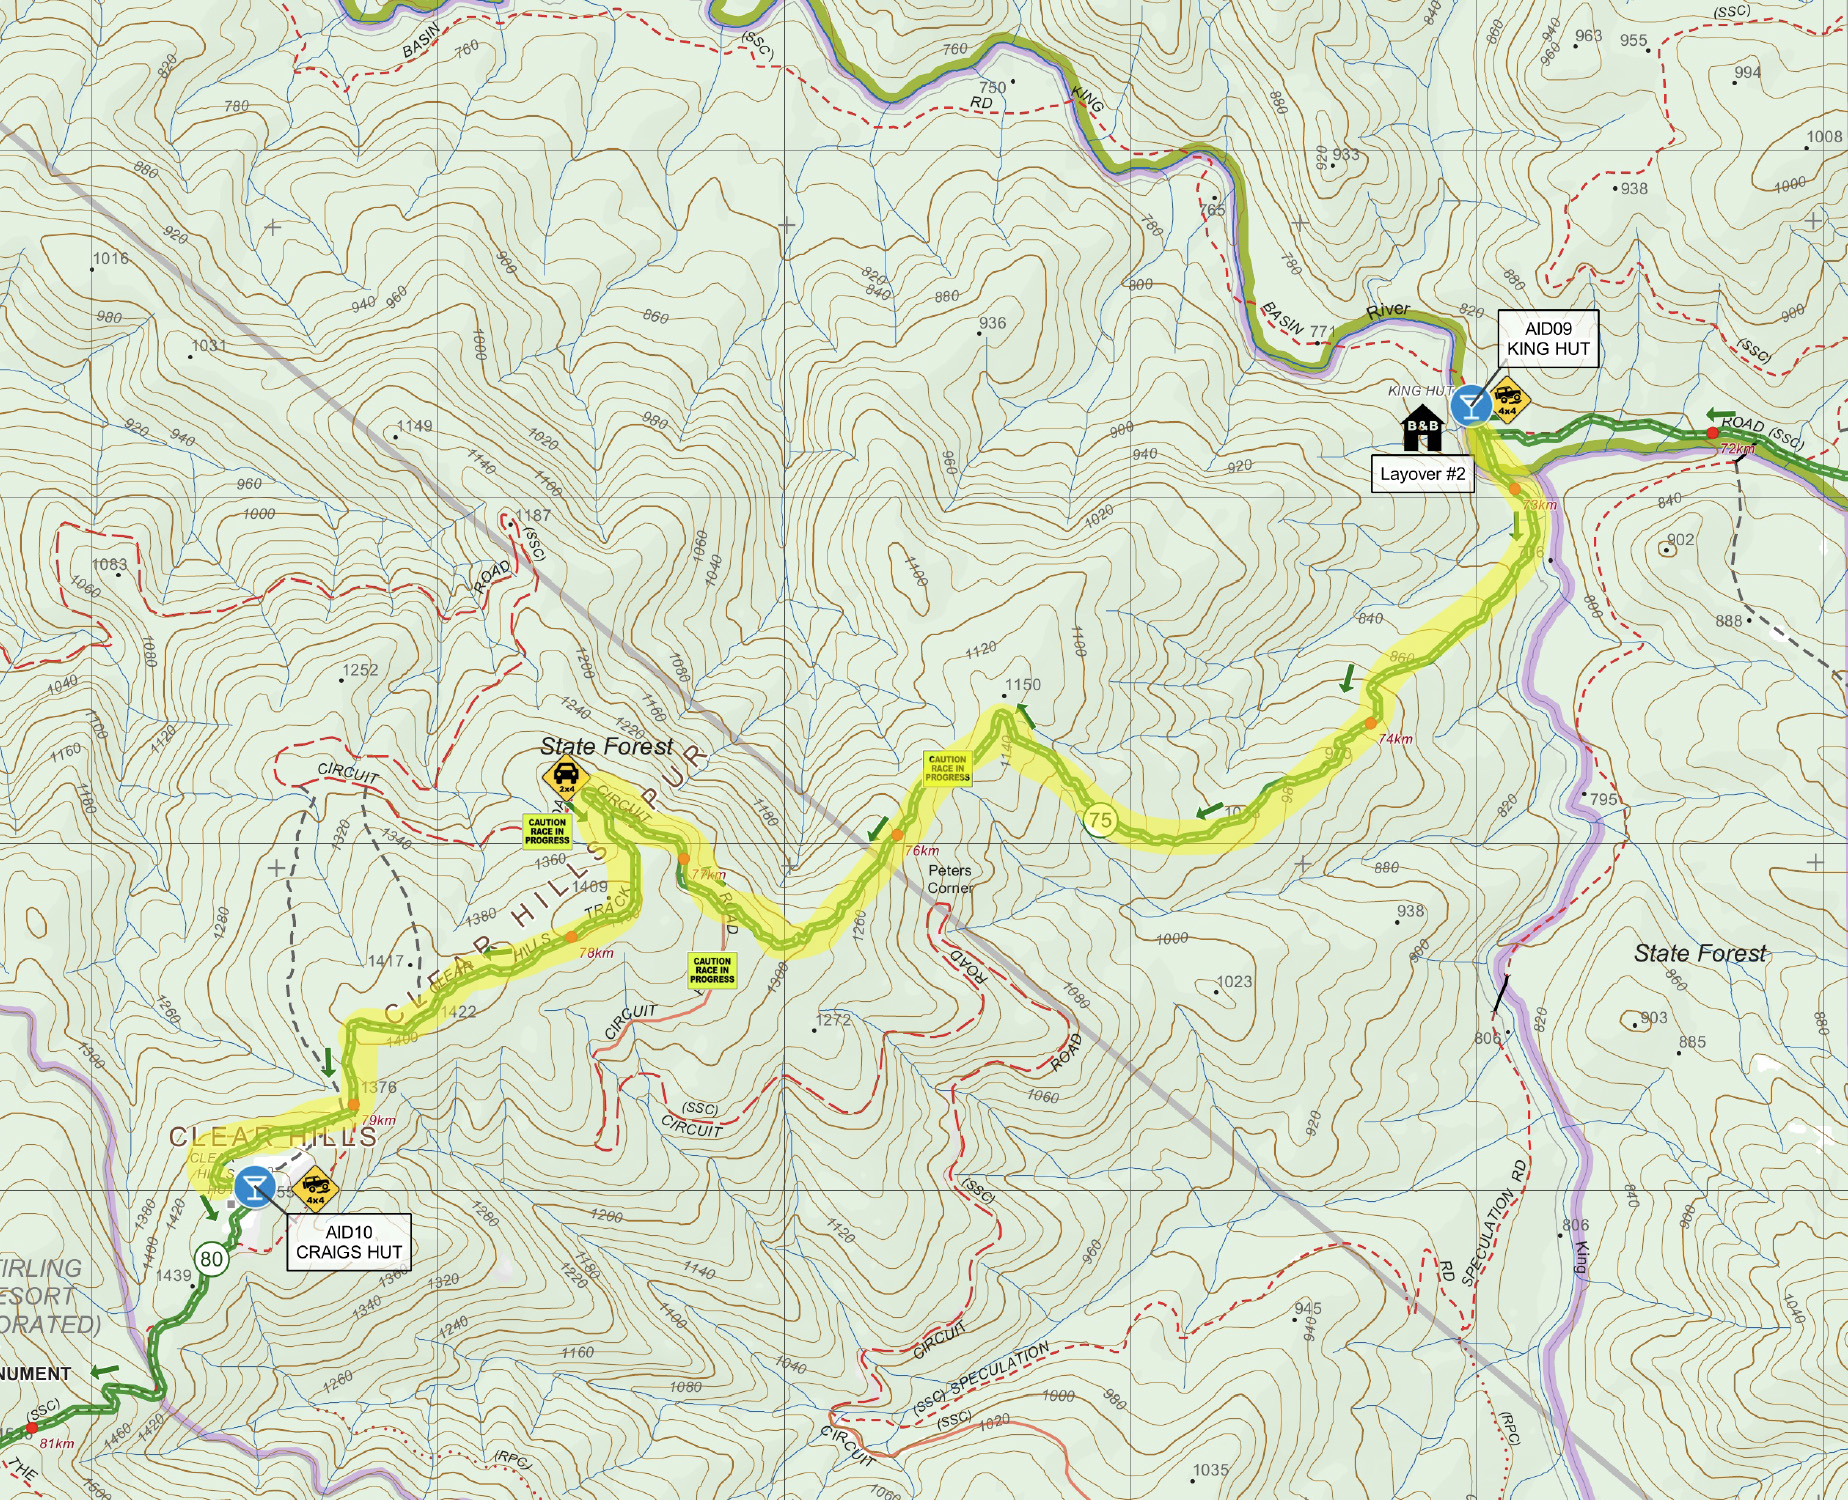
SECTION TEN
CRAIG’S HUT – GEELONG GRAMMAR HUT
Having savoured the faux (but representative) history of Craig’s Hut, it’s time to keep moving. Head to the car park off to the south west and take the 4WD trail that is Clear Hills Track. It’s a stunning track with some beefy climbs that will lead you all the way towards the exposed Mt Stirling. As you pop out onto Stirling flanks keep on the dirt road and go straight ahead past/around a gate, towards Geelong Grammar School Hut – this is a MANDATORY check in.
Interesting fact: Geelong Grammar Hut marks the first point at which you will have done more climbing than descending!
Geelong Grammar Hut Cut Offs
- 1 Day Solo runners – 11.30PM Friday
- 2 Day Solo and 2 Day Teams – 8.30PM Saturday
- 3 Day Teams – 8AM Sunday
Leg distance: 4.4km
Leg Ascent: 365m
Leg Descent: 148m
Cumulative distance: 84.5km
Cumulative Ascent: 5085m
Cumulative Descent: 5004m
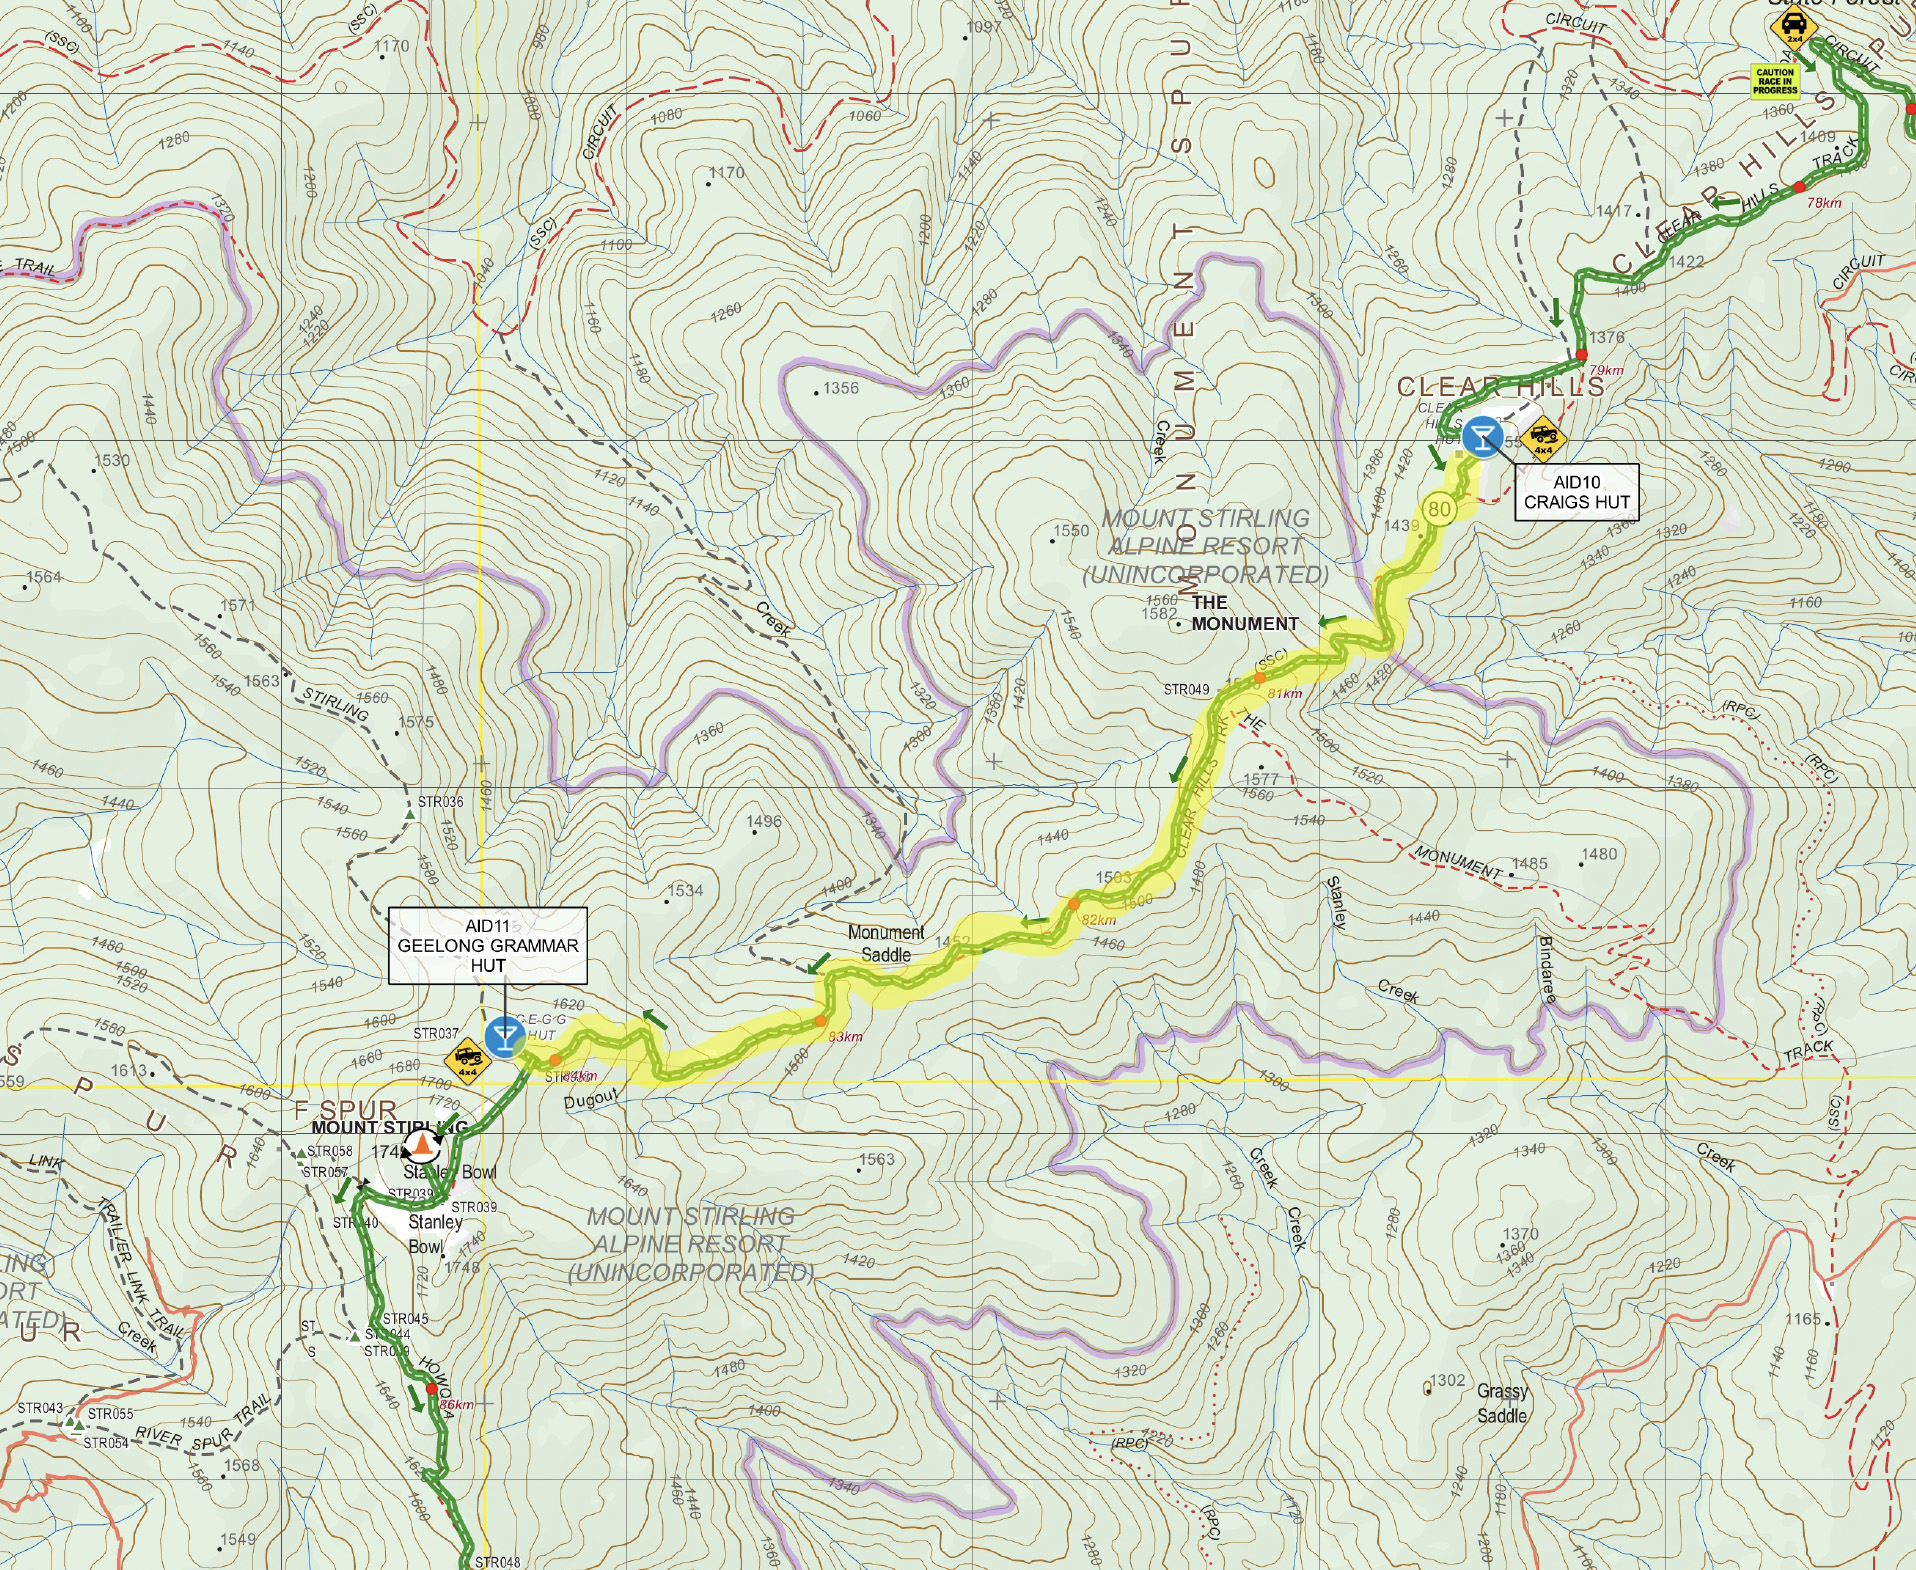
SECTION ELEVEN
GEELONG GRAMMAR HUT – MT STIRLING – HOWQUA GAP HUT
Once reaching Geelong Grammar Hut, you will sign in, and then turn around, heading back to the intersection where you will turn right (south) to wind around and up to the summit of Stirling. At Mt Stirling (1749m) you are required (for the fun of it) to head up to the summit – a short 180m trek up – and back before continuing your journey.
Coming off Mt Stirling, keep to the Howqua Gap 4WD track that sweeps around to your left. Follow it on an undulating 4WD trail that starts to descend, eventually sweeping back right and dropping sharply! Here there is a bunch of switchbacks and wash out mounds. Uncomfortable trekking or walking, as it is steep, especially given you’ve got more than 80km in the legs! The 4WD trail weaves down towards your next (and final) hut: Howqua Gap Hut, where you pop out.
Howqua Gap Hut Cut Offs
- 1 Day Solo runners – 12AM Friday
- 2 Day Solo and 2 Day Teams – 9PM Saturday
- 3 Day Teams – 9AM Sunday
*It is imperative that you keep moving at a decent speed – trekkers inclusive – hence these cut offs are to ensure you stay ahead of an overall DNF.
Leg distance: 4.8km
Leg Ascent: 122m
Leg Descent: 390m
Cumulative distance: 90.4km
Cumulative Ascent: 5269m
Cumulative Descent: 5462m
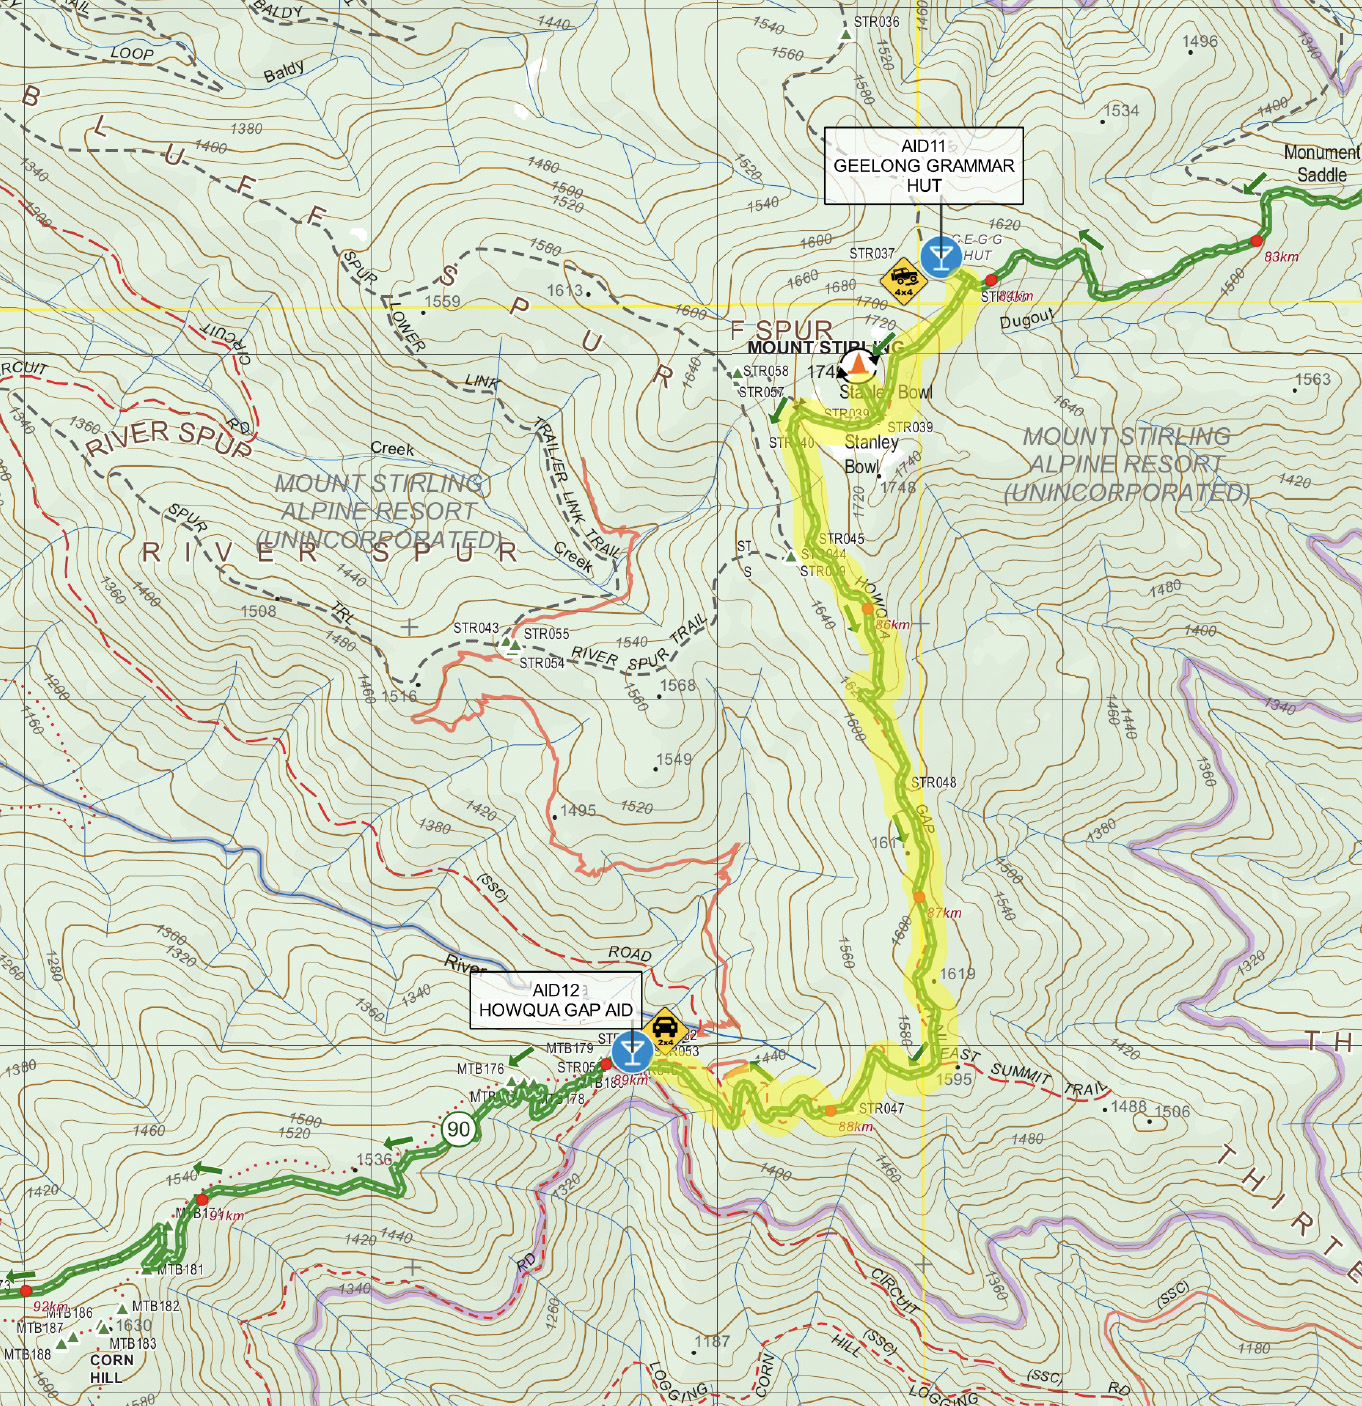
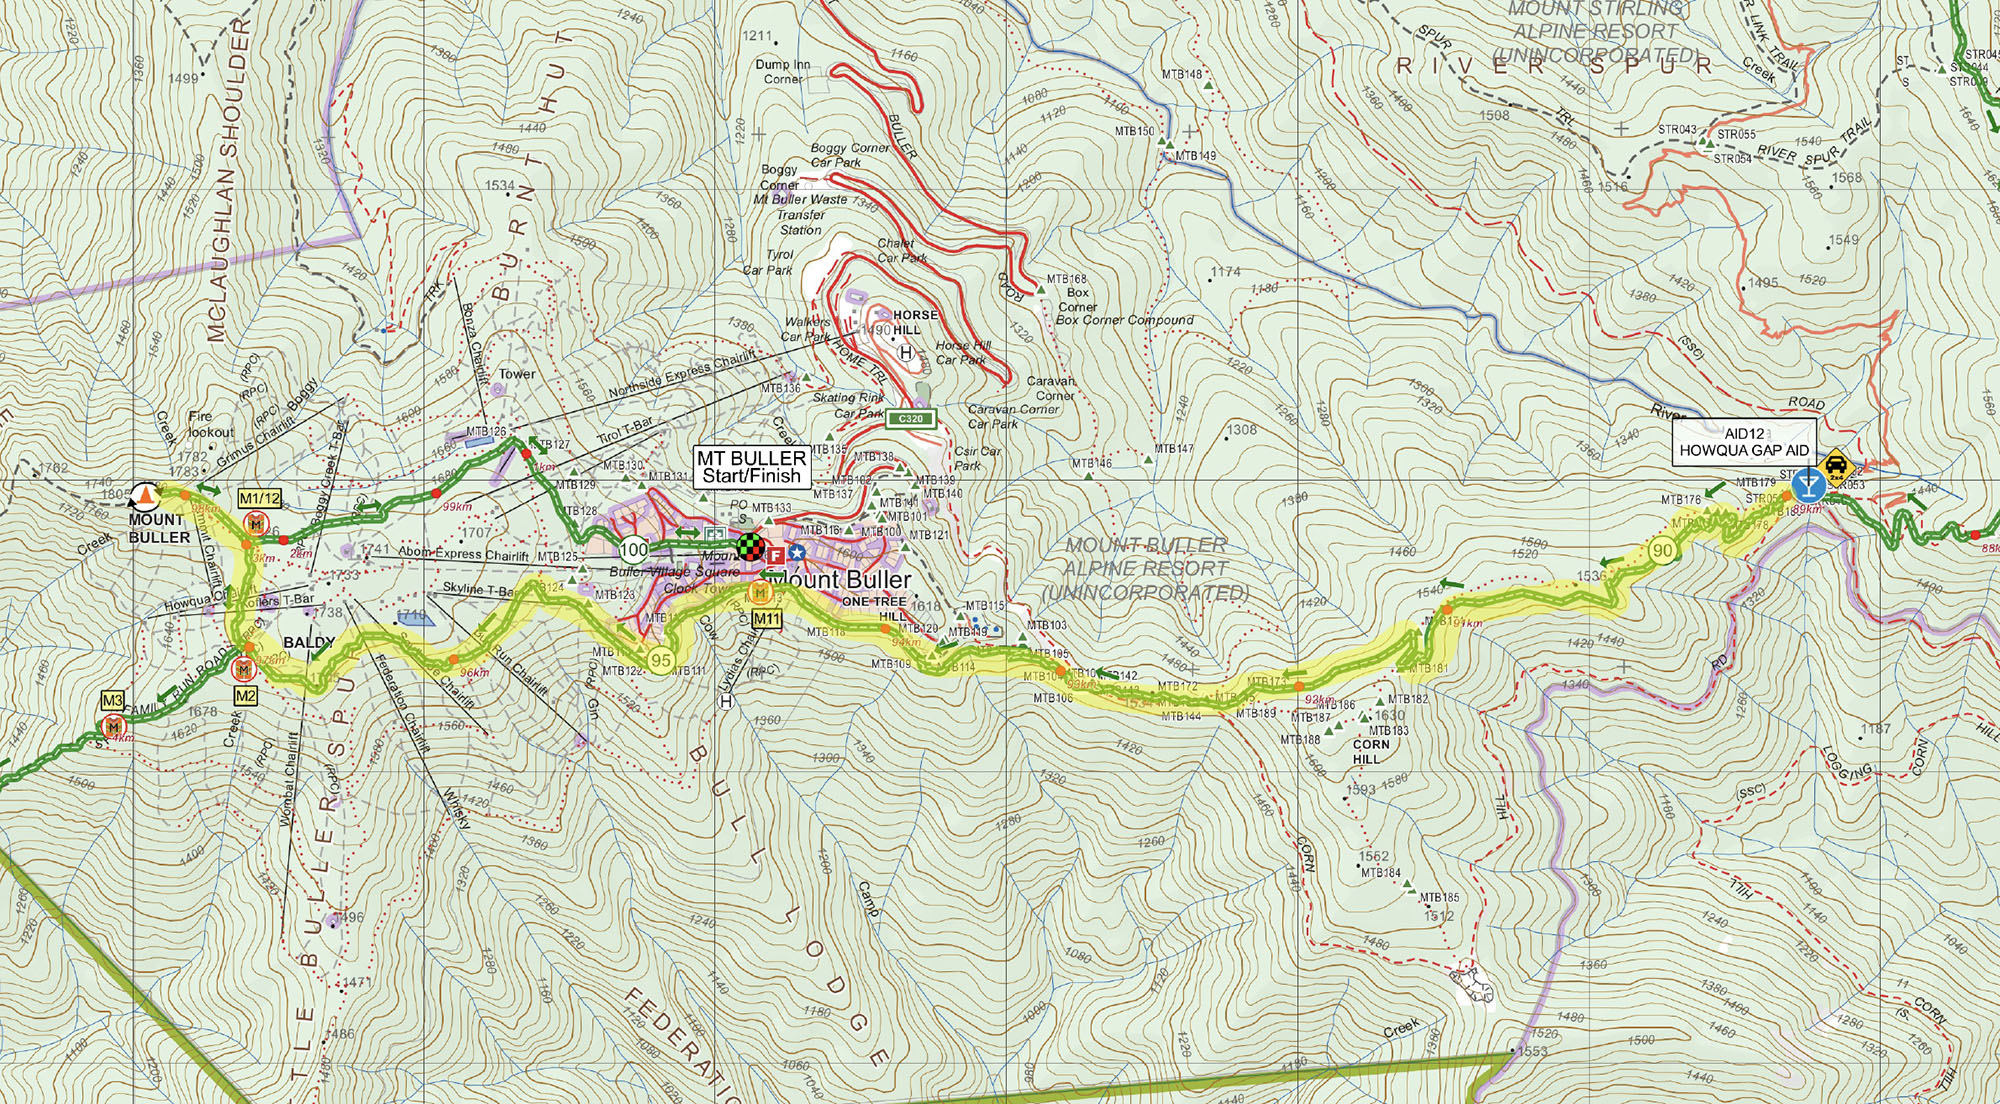
SECTION TWELVE
HOWQUA GAP HUT – MT BULLER SUMMIT – VILLAGE FINISH
Nearly home, you can feel it. But first a gradual climb up Corn Hill track. At this point shoot straight up the 4WD access track, not the mountain bike trails. Follow the markings and head towards Mt Buller. The track will eventually come to an intersection where numerous MTB trails converge: Cornhill, Clancy’s Run, Delatite River, Picnic Trail and Wombat. Wombat Trail is the one you want.
Pick up Wombat Trail. This will lead you down into a small skills section of the MTB trail, before spitting you out, back over Corn Hill Road, and into another small skills section. The trail will lead you on up a small gradient along Split Rock Trail. Keep sidling to the left, don’t take any of the trails coming in at you from the right. Split Rock switchbacks up to join Family Trail, a flat, wide trail. Turn left and travel along, noticing the Buller Village just above you. Indeed, the finish line is within cooee here but first you have one last trying task to complete – a return to the Summit from whence you came! (It’s all about ‘completing the circle). So keep running along Family, until you are directed up what looks like a steep ski run (Because that’s what it is).
Follow signage until you pick up the southern section of the Summit Nature Walk. This leads to the car park at the bottom of Buller Summit. Up you go. Collect your page from the Offical Book of Achievement (we have to get you to prove you’ve been up there somehow!), and then head back down, this time veering left (north) along Summit Nature Trail, which is following your footsteps from when you came up here last at the start of the challenge. Back past Northside Discovery Centre, back to the Arlberg (don’t stop for a beer just yet), down the road to pick up Athletes Walk and the chute down into the Village Square and ta-da – 101km or thereabouts later, the finish line will greet you as will Oscars 100 event staff with big hugs. Promise.
FINISH LINE Cut Offs
- 1 Day Solo runners – 3AM Friday
- 2 Day Solo and 2 Day Teams – 12AM Sunday
- 3 Day Teams – 12PM Sunday
Leg distance: 11.5km
Leg Ascent: 574m
Leg Descent: 377m
Cumulative distance: 101km
Cumulative Ascent: 5770m
Cumulative Descent: 5770m
*A NOTE ON ACCURACY OF DISTANCE / ASCENT / DESCENT STATS:
The distance / ascent / descent statistics have been gathered from multiple course runs (full loops), using measurement instruments inclusive of Garmin handheld, Garmin Fenix 3 wrist unit and Suunto Ambit2/3/9 units.
Data was collated and sections judged most accurate from each chosen and integrated into an ‘edited course’ using Garmin Basecamp. There will be some inconsistencies over any 100km course.
All distances and ascent/descents are listed as indicative only.
The data as current listed was revised in December 2020, and reviewed / corrected by our mapping partner, Terranium. Data has been determined on current set by sampling the elevations from the latest Vicmaps 5m resolution Digital Terrain Model – this gives a consistent base for all tracks, irrespective of the source.
THE COURSE: EXPECTED TIMINGS
Take your expected finish time and then add some! That’s the experience from the last three years.
ARE YOU A RUNNING TEAM OR SOLO RUNNER?
Timings based loosely on first runner from 2019 event, no sleep over on course.
Fastest moving participant/s
> arrives bottom 4 Mile // 6.15am
> arrives 8 Mile // 7am
> arrives Refrigerator Gap // 8.15am
> arrives Bluff Hut // 9.15am
> arrives at Lovicks Hut post // 10.15am Friday (>5hour+ total time 38.6km)
> arrives at King Hut post // 3.30pm Friday (10+hrs total time 74.2km)
> arrives Craigs Hut // 4.15pm
> arrives Geelong Grammar Hut // 4.45pm
> arrives Howqua Gap Hut // 5.15pm
> arrives Buller // 6.30pm (13.5 hours total time for 100km).
Average mid pack moving run participant / no sleep over / approximations
> arrives at Lovicks post 12 noon Friday (one hour ahead of cut off)
> arrives at Kings post 8pm Friday (one hour ahead of cut off)
> arrives Buller post 1.30am Saturday
> LAST RUN PARTICIPANT due at Buller finish 2.30am Saturday.
ARE YOU A TREKKING TEAM?
Slowest moving trek participant:
> arrives at Lovicks post 2-3pm Friday (10 hour moving time for 37.5km) REST/SLEEP OVER <14 hours
> leaves Lovicks 5am Sat
> arrives at Kings post 6pm Saturday (13 hours+ moving time for 34km) SLEEP OVER <9 hours
> leaves Kings 5am Sunday
> Arrives Buller prior 12 noon cut off (7 hours moving time for 28km)
Slowest moving competitor: 30 hours moving time + 13hrs rest Lovicks + 9hrs rest Kings = 52 hours total on course (cut off = 55 hours)
All Team runners/trekkers: we will only accept one drop bag the size of regular shopping zip-up cube bag (pictured) per person.